
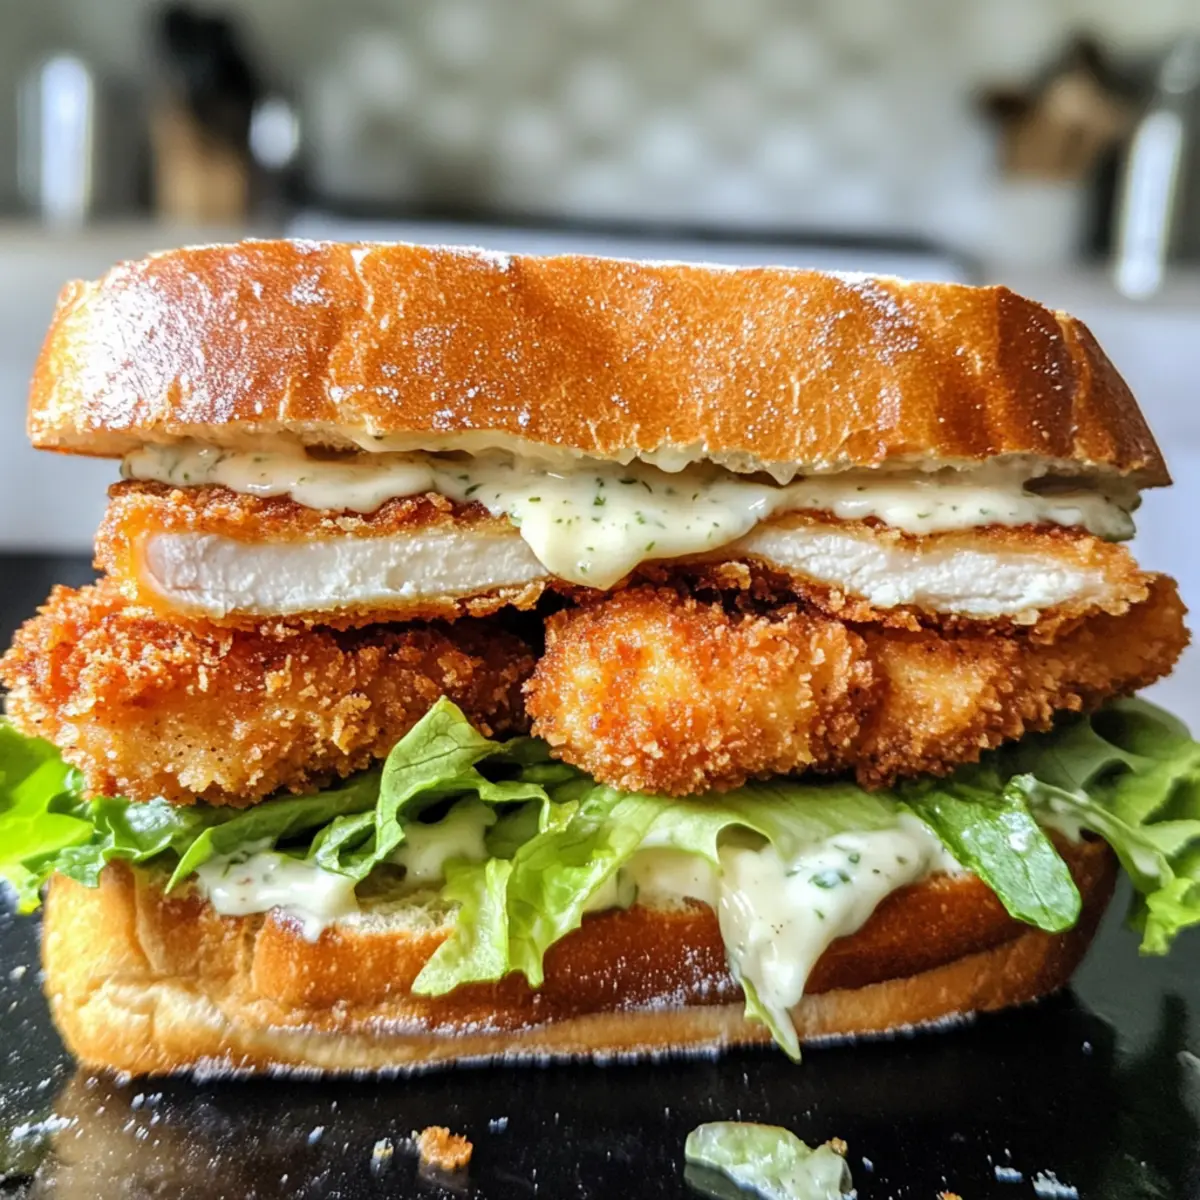
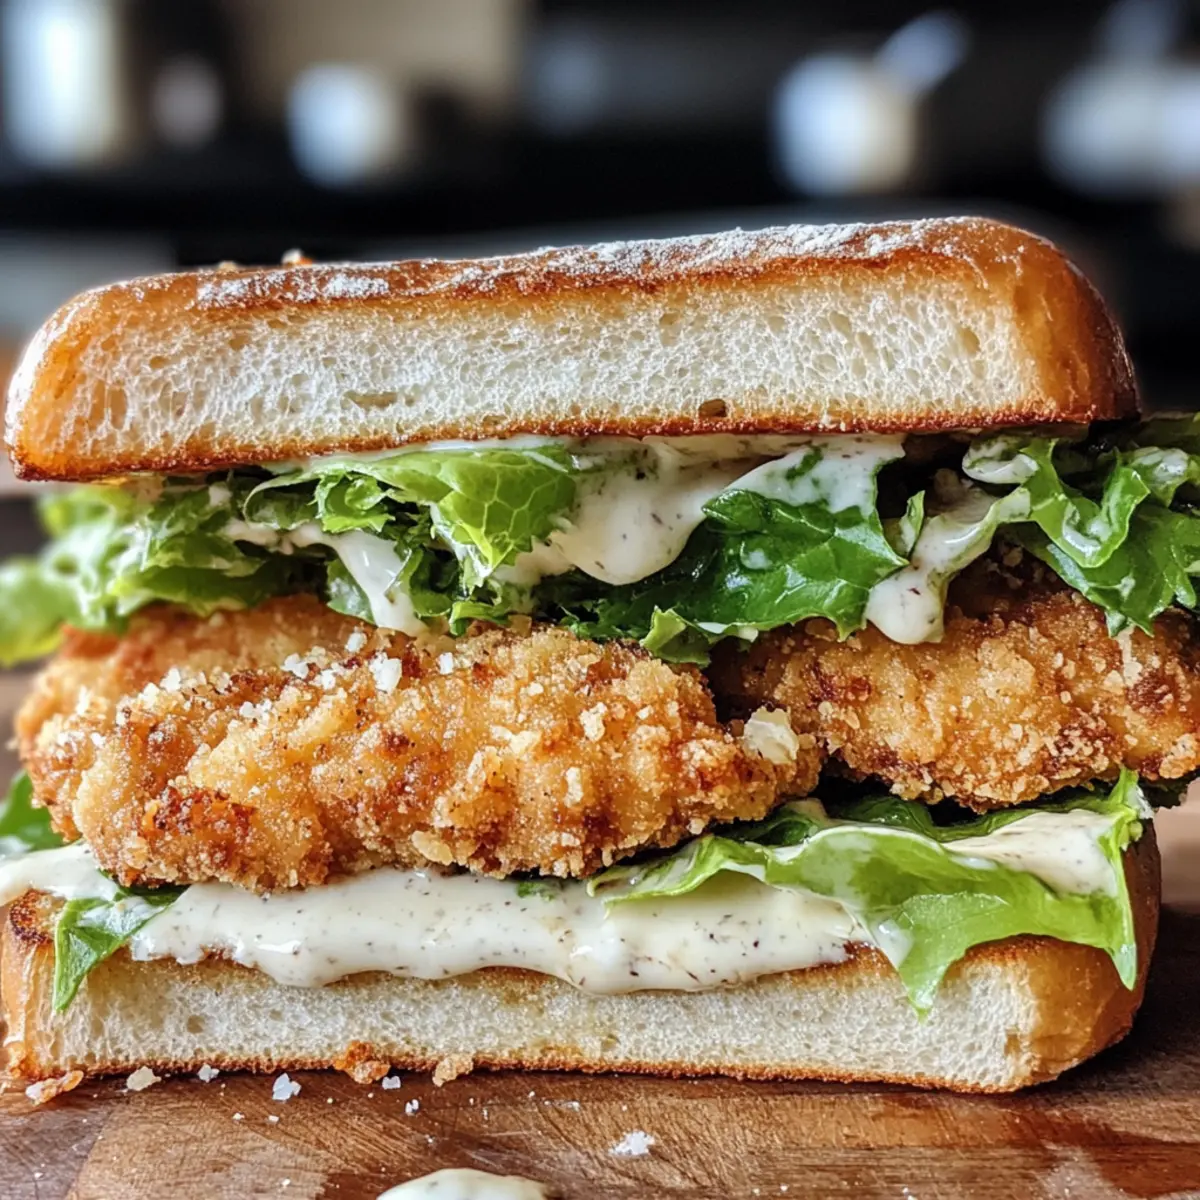
As I flipped through my recipe book one rainy afternoon, a sudden craving hit me: the kind that begs for comfort wrapped in crispy goodness. Enter my crispy Chicken Caesar Sandwiches. This isn’t just any sandwich; it’s a delightful feast featuring tender, golden chicken cutlets nestled between garlic butter toast, crowned with fresh romaine and a zesty dressing. In less than 30 minutes, you’ll transport your taste buds straight to a cozy bistro without the hassle of reservations. Not only are these sandwiches a guaranteed crowd-pleaser, but they also offer a healthier alternative to fast food, letting you indulge guilt-free. Don’t you want to know how to elevate your lunch game today?

Why Try These Chicken Caesar Sandwiches?
Savory, Crispy Goodness: Experience the irresistible crunch of perfectly fried chicken cutlets that make every bite a celebration of flavor.
Quick and Easy: Ready in just 30 minutes, these tasty sandwiches fit perfectly into your busy schedule without sacrificing taste.
Healthier Alternative: Skip the fast food and enjoy a homemade meal that allows you to control ingredients, from fresh chicken to zesty dressing.
Crowd-Pleasing Flavor: Everyone will adore the classic combination of garlic butter toast, crispy chicken, and fresh romaine. Pair them with a light salad or Chicken Alfredo Tater for a complete meal!
Versatile Options: Customize your sandwich with grilled tofu or spicy pepper jack cheese for a unique twist that caters to different tastes.
Chicken Caesar Sandwiches Ingredients
For the Chicken
• Chicken Breasts – Main protein source; ensure they are fresh and boneless for even cooking.
• Egg (whisked with milk) – Acts as a binder for the breading; a flax egg can be used for a vegan version.
• Garlic Powder, Salt, Pepper – Essential seasonings for the chicken; adjust to personal taste preference.
• Breadcrumbs – Adds that delightful crunch; use panko for extra crispiness.
• Vegetable Oil – Used for frying; canola or peanut oil are good high-temperature alternatives.
For the Garlic Butter Toast
• Salted Butter – Provides richness to the garlic butter; unsalted butter works too but adjust salt accordingly.
• Mayo – Base for the garlic butter and dressing; substitute with Greek yogurt for a lighter option.
• Garlic (minced) – Enhances flavor; fresh garlic is preferable, but powder can be a decent substitute.
• Fresh Parsley – Adds a pop of freshness; dried parsley can be used if fresh is unavailable.
For the Creamy Dressing
• Finely Grated Parmesan – Introduces a nutty flavor to the sandwich; consider vegan cheese for a dairy-free option.
• Sour Cream or Greek Yogurt – Adds creaminess to the dressing; can be swapped with mayo if preferred.
• Lemon Juice – Brightens the dressing’s flavor; lime juice is a good substitute.
• Dijon Mustard, Anchovy Paste, Worcestershire Sauce – Contributes depth and umami; omit anchovy paste for a vegetarian take.
For Assembly
• Romaine Lettuce – Provides freshness and crunch; substitute with iceberg lettuce if desired.
• Hoagies or Baguette – The sandwich’s base; try whole grain for added fiber and nutrients.
Now you have everything you need to create these mouthwatering Chicken Caesar Sandwiches!
Step‑by‑Step Instructions for Chicken Caesar Sandwiches
Step 1: Prepare the Chicken
Slice the chicken breasts into thin cutlets, ensuring even cooking. In a mixing bowl, whisk together the egg and milk, then add garlic powder, salt, and pepper. Dip each chicken cutlet into the egg mixture, allowing any excess to drip off, before coating it evenly in breadcrumbs to create a crunchy exterior.
Step 2: Fry the Chicken
Heat a shallow pan over medium-high heat and add vegetable oil, allowing it to reach 350°F for optimal frying. Carefully place the breaded chicken cutlets in the hot oil and fry for about 5 minutes on each side, or until they are golden brown and crispy. Once cooked, transfer the chicken to paper towels to drain excess oil.
Step 3: Make the Garlic Butter Bread
In a small bowl, mix softened butter, mayo, minced garlic, and chopped parsley to create a flavorful garlic butter spread. Slice the hoagies or baguette in half lengthwise and spread the garlic butter mixture generously on the inside. Toast the bread in a preheated oven at 450°F or under the broiler for 3-4 minutes, until golden brown and fragrant.
Step 4: Prepare the Dressing
In another mixing bowl, combine mayo, sour cream, finely grated Parmesan, lemon juice, Dijon mustard, anchovy paste, Worcestershire sauce, minced garlic, and a pinch of salt and pepper. Whisk the dressing until smooth and creamy, adjusting seasonings to your taste. This zesty dressing will take your Chicken Caesar Sandwiches to the next level.
Step 5: Assemble the Sandwich
Begin assembling your Chicken Caesar Sandwiches by layering the crispy chicken cutlets on one side of the toasted bread. Top with a generous handful of dressed romaine lettuce and an extra sprinkle of Parmesan cheese for added flavor. Place the other half of the toasted bread on top, pressing down gently to secure the delicious fillings.
Step 6: Serve Immediately
Cut the assembled Chicken Caesar Sandwiches in half for easy handling and serve them while they’re warm and crunchy. Pair these satisfying sandwiches with classic sides like potato chips or a light salad for a complete meal. Enjoy the delightful combination of textures and flavors that make this dish a family favorite!
Expert Tips for Chicken Caesar Sandwiches
- Temperature Check: Ensure the oil is at 350°F before frying. Use a thermometer for the best crispiness and avoid soggy chicken.
- Prep Ahead: Prepare all ingredients in advance for a smoother cooking process. The dressing can be made ahead of time and refrigerated.
- Fry Immediately: Fry the chicken right after breading to maintain its crunch. Letting it sit can lead to a soggy texture.
- Storage Savvy: Store leftover ingredients separately; keep chicken, lettuce, and bread apart to preserve freshness and texture.
- Flavor Boost: For extra pizzazz, try adding a dash of hot sauce to the dressing or sandwich for a spicy kick, making your Chicken Caesar Sandwiches unforgettable.
Chicken Caesar Sandwiches Variations
Feel free to make these Chicken Caesar Sandwiches your own by trying out these fun and tasty variations!
-
Dairy-Free: Swap out the cheese and mayonnaise for a dairy-free alternative like cashew cream and nutritional yeast for a rich flavor.
-
Grilled Shrimp: For a seafood twist, grill shrimp instead of frying chicken. The smokiness adds a delightful depth.
-
Different Bread Types: Change it up by using crusty ciabatta or fluffy focaccia instead of hoagies. Each option brings its unique texture!
-
Spicy Kick: Add sliced jalapeños or a spread of sriracha for a spicy hit. The heat will balance perfectly with the creamy dressing.
-
Baked Chicken: For a healthier option, bake the breaded chicken cutlets in the oven at 400°F for 20 minutes, turning halfway through to achieve crispiness.
-
Crispy Chickpeas: Ditch the meat altogether and add roasted chickpeas for a satisfying crunch and an excellent protein boost.
-
Extra Herbaceous: Incorporate fresh basil or dill into your dressing for a fresh twist that brightens up the whole sandwich.
-
Garlic Butter Sauce: Brush extra garlic butter onto the tops of the hoagies before toasting for an added layer of richness. You might even find it pairs well with a side of Garlic Parmesan Chicken!
With these variations, your kitchen can be a vibrant canvas for delicious creativity!
What to Serve with Crispy Chicken Caesar Sandwiches?
Pairing your sandwiches with the perfect sides transforms a delightful lunch into an unforgettable meal experience. Let’s get those taste buds ready!
- Classic Potato Chips: The crunchiness of potato chips complements the crispy chicken perfectly, adding a satisfying snack element to your meal.
- Waffle Fries: These crispy, golden fries offer a delightful twist and pair wonderfully with the rich flavors of the Caesar dressing.
- Fresh Fruit Salad: A refreshing fruit salad adds a burst of sweetness, balancing the savory flavors of the sandwich beautifully.
- Caesar Salad: Why not double down? A classic Caesar salad adds a familiar touch while enhancing the sandwich’s key flavors.
- Coleslaw: Creamy coleslaw provides a cool, crunchy contrast that works well with the warm, crispy sandwich.
- Iced Tea: A refreshing iced tea, sweetened or unsweetened, offers a cool sip that enhances each delicious bite, making it feel like a picnic!
- Lemonade: The zesty brightness of lemonade pairs beautifully with the savory taste of chicken, leaving you refreshed between bites.
- Chocolate Chip Cookies: Finish your meal with warm, gooey chocolate chip cookies for a sweet treat that everyone will love.
- Garlic Bread: For an extra flavor punch, serve with garlicky, buttery bread; it’s the ultimate pairing for any Italian-inspired sandwich!
- Sparkling Water: This light and bubbly drink cleanses the palate, ensuring each delicious bite of your Chicken Caesar Sandwich remains memorable.
Storage Tips for Chicken Caesar Sandwiches
-
Room Temperature: Chicken Caesar Sandwiches are best enjoyed fresh. If left out, consume within 2 hours to ensure food safety.
-
Fridge: Store any leftover chicken, lettuce, and bread separately in airtight containers. They can be kept in the refrigerator for up to 3 days, maintaining their individual textures.
-
Freezer: For longer storage, freeze the cooked chicken cutlets only (avoid freezing assembled sandwiches). Wrap tightly and store for up to 2 months. Thaw in the fridge before reheating.
-
Reheating: To reheat the chicken, place it in an oven or air fryer until heated through (about 15 minutes at 350°F). This helps retain crispiness, making your Chicken Caesar Sandwiches just as delightful as the first bite!
Make Ahead Options
These Chicken Caesar Sandwiches are perfect for meal prep! You can prepare the crispy chicken cutlets up to 24 hours in advance. Simply follow the first two steps of the recipe, let the fried chicken cool, then store it in an airtight container in the refrigerator. The creamy dressing and garlic butter can also be made ahead and refrigerated for up to 3 days; just give them a good stir before assembly to refresh their flavors. When you’re ready to serve, quickly reheat the chicken in the oven or air fryer until warm and crispy, then assemble your sandwiches with fresh romaine and toasted garlic butter bread. This way, you’ll enjoy delicious Chicken Caesar Sandwiches with minimal effort on busy weeknights!

Chicken Caesar Sandwiches Recipe FAQs
What type of chicken breasts should I use?
Absolutely! It’s best to use fresh, boneless chicken breasts for even cooking and the juiciest results. If you find chicken with a pinkish hue or any dark spots, opt for fresher pieces as they provide the best flavor for your sandwiches.
How should I store leftover Chicken Caesar Sandwiches?
For the best taste experience, store leftover chicken, lettuce, and bread separately in airtight containers in the refrigerator. This helps maintain their respective textures. They will stay fresh for up to 3 days.
Can I freeze the cooked chicken cutlets?
Yes, indeed! To freeze your chicken cutlets, allow them to cool first. Wrap each piece tightly in plastic wrap or aluminum foil and then place them in a freezer-safe bag. These will keep well for up to 2 months. When you’re ready to enjoy, thaw in the fridge overnight and reheat in an oven or air fryer for about 15 minutes at 350°F for optimal crispiness.
What should I do if my chicken cutlets are soggy?
Very! If you encounter sogginess, ensure the oil was at a proper temperature of 350°F while frying. If they are still soggy, I often suggest placing the fried chicken on a cooling rack instead of paper towels after frying; this allows air to circulate around them. If they’ve already cooled, a quick reheat in the oven can restore some crunch!
Can I make this sandwich vegetarian-friendly?
You can absolutely customize this to your taste! Swap out the chicken for grilled tofu or even some crispy chickpeas for a hearty vegetarian alternative. You can also use grilled shrimp for a delightful seafood twist that everyone will enjoy!
Are there any allergy considerations with this recipe?
Definitely! Be mindful of any allergies when preparing Chicken Caesar Sandwiches. The recipe contains common allergens like eggs and dairy. For dairy-free options, substitute with vegan mayonnaise and cheese. If anyone is allergic to eggs, a flax egg can be used for binding without sacrificing too much texture. Always double-check with your diners about their dietary requirements to ensure everyone’s safe and satisfied!
Feel free to reach out if you have more questions or need help with substitutions! Happy cooking!
Savory Chicken Caesar Sandwiches Ready in 30 Minutes
Ingredients
Equipment
Method
- Slice the chicken breasts into thin cutlets, ensuring even cooking. In a mixing bowl, whisk together the egg and milk, then add garlic powder, salt, and pepper. Dip each chicken cutlet into the egg mixture, allowing any excess to drip off, before coating it evenly in breadcrumbs.
- Heat oil in a shallow pan over medium-high heat to 350°F. Carefully place the breaded chicken cutlets in the hot oil and fry for about 5 minutes on each side until golden brown and crispy. Transfer to paper towels to drain excess oil.
- In a small bowl, mix softened butter, mayo, minced garlic, and chopped parsley. Slice the hoagies or baguette in half and spread the garlic butter mixture on the inside. Toast the bread in a preheated oven at 450°F for 3-4 minutes.
- In another mixing bowl, combine mayo, sour cream, Parmesan, lemon juice, Dijon mustard, anchovy paste, Worcestershire sauce, minced garlic, and a pinch of salt and pepper. Whisk until smooth and creamy.
- Layer the crispy chicken cutlets on one side of the toasted bread. Top with dressed romaine lettuce and an extra sprinkle of Parmesan cheese. Place the other half of the toasted bread on top.
- Cut the assembled sandwiches in half and serve while warm and crunchy.
Leave a Reply