
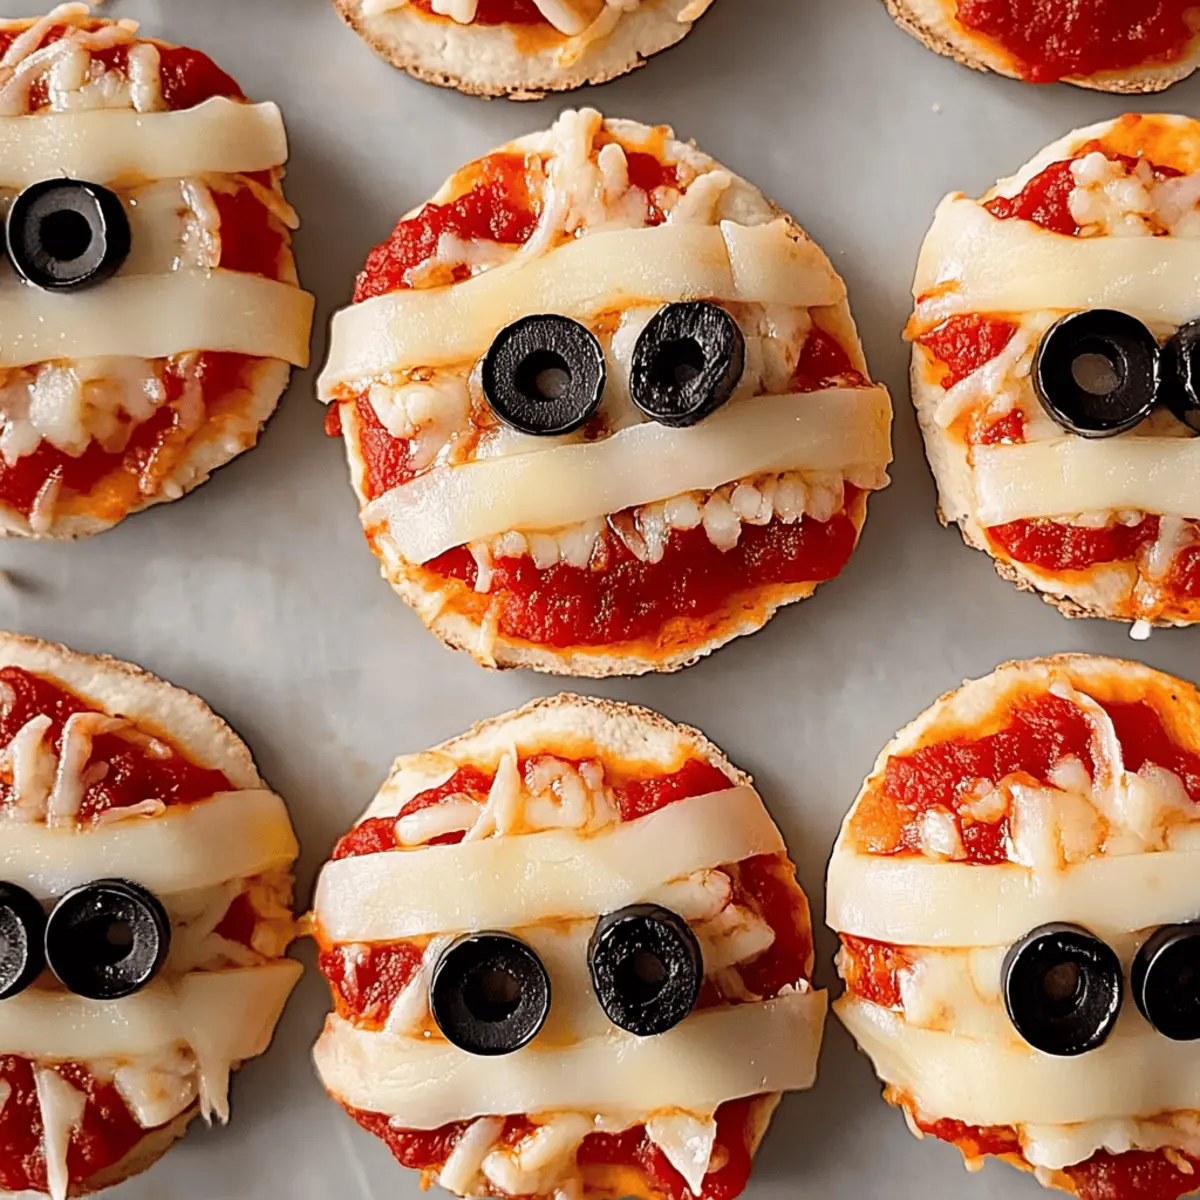
As the autumn breeze starts to whisper and the leaves turn vibrant shades, thoughts of Halloween treats and cozy gatherings fill the air. One of my favorite spooky delights to whip up in a flash are these Quick & Healthy Mini Mummy Pizzas. Combining fun and nutrition, these adorable bites come together in under 15 minutes, making them a perfect solution for busy parents or anyone wanting to add a little festive flair to snack time. With a crispy base and gooey cheese that resembles clever mummy wrappings, they are bound to be a hit with both kids and adults alike. Plus, they offer dairy-free options so everyone can join in on the fun! Looking for a quick, playful recipe that’s sure to be a crowd-pleaser? Let’s dive into how to create these charming little faces!
Why Are Mini Mummy Pizzas So Fun?
Quick Preparation: These Halloween Mini Mummy Pizzas are ready in under 15 minutes, perfect for busy weeknights or last-minute parties!
Kid-Friendly: Kids adore helping in the kitchen, and these pizzas are a fun way to get them involved in creating their spooky snacks!
Customizable Options: With alternatives like gluten-free bases and dairy-free cheese, everyone can enjoy this festive treat regardless of dietary preferences. Explore even more playful variations like our Halloween Witch Cookies for extra fun!
Savory Delight: With their crispy texture and cheesy goodness, they’re more than just a treat; they can even serve as a light lunch or snack at any gathering.
Visual Appeal: The cute mummy design makes these pizzas not only delicious but a hit for any Halloween celebration, adding festivity and flair to your table!
Halloween Mini Mummy Pizza Ingredients
For the Pizza Base
• English Muffins – The perfect canvas for your mini mummies; substitute with mini pizza bases, crumpets, or mini pita bread if desired.
For the Sauce
• Pizza Sauce – Adds moisture and zesty flavor; feel free to try alternative sauces like pesto for a unique twist.
For the Mummy Wrappings
• String Cheese Sticks – Create the whimsical mummy look; for a dairy-free option, replace with vegan cheese strips or zucchini peels.
For the Eyes
• Olive Slices – Adds character to your mummies; blueberries can be a fun alternative, but olives work best for that classic spooky look!
With these simple ingredients, you’ll have everything you need to make delightful Halloween Mini Mummy Pizzas, perfect for entertaining and snacking!
Step‑by‑Step Instructions for Halloween Mini Mummy Pizzas
Step 1: Preheat the Oven
Begin by preheating your oven to 220°C (430°F). This will ensure a perfectly crispy base for your Halloween Mini Mummy Pizzas. While the oven is heating, gather your ingredients and equipment, including a baking sheet lined with parchment paper. The warm air will create all the magic in melting the cheese!
Step 2: Prepare the Muffins
Slice the English muffins in half, placing them cut side up on your prepared baking sheet. If you desire an extra crunch, lightly toast the muffins for 3-5 minutes in your toaster or oven before proceeding. This step is optional but will enhance the flavor and texture of your Mini Mummy Pizzas.
Step 3: Spread the Sauce
Take your favorite pizza sauce and generously spread it across the cut side of each muffin half. Ensure each half is evenly coated for maximum flavor. The vibrant color of the sauce will add a delightful contrast to the melted cheese, making your Halloween Mini Mummy Pizzas visually appealing and savory!
Step 4: Create Mummy Wrappings
Unwrap the string cheese sticks and gently pull them apart into strips. Layer these cheese strips over the sauce on each muffin half, resembling mummy wrappings. Make sure to leave a small gap at the top for the eyes to peek through—this will give your mummies their spooky character.
Step 5: Add the Eyes
Now it’s time to make your Mini Mummy Pizzas come to life! Place two olive slices in the gap you left at the top of the cheese strips to create the eyes. Feel free to get creative with alternative toppings like blueberry slices if you’re feeling playful!
Step 6: Bake the Pizzas
Carefully place your assembled Mini Mummy Pizzas into the preheated oven. Bake for about 5-10 minutes, or until the cheese is melted, bubbly, and slightly golden. Keep a close eye on them to achieve the perfect level of doneness; the gooey cheese should resemble the classic mummy look!
Step 7: Cool and Serve
Once done, take the baked Halloween Mini Mummy Pizzas out of the oven and let them cool for a few minutes on the baking sheet. This will help them set a bit and make them easier to handle. Serve warm with a side of carrot sticks or celery for a fun and festive snack that everyone will enjoy!
What to Serve with Halloween Mini Mummy Pizzas
These Mini Mummy Pizzas are not only fun to make, but they also pair wonderfully with various sides and drinks that complement their spooky charm.
- Crispy Carrot Sticks: These crunchy sticks provide a fresh contrast to the cheesy goodness of the pizzas, adding a healthy crunch that kids will love.
- Creamy Hummus: A savory and slightly tangy dip that balances the flavors of the mummies while introducing a different texture, ideal for dunking!
- Celery Boats with Cream Cheese: These playful celery boats filled with cream cheese offer an additional layer of fun, paired beautifully with your spooky snacks.
- Apple Slices with Nut Butter: The sweet and creamy combination of apple slices dipped in almond or peanut butter brings a delightful twist, enhancing the taste experience.
- Mini Fruit Skewers: Colorful and fruity, these skewers bring a smile to every plate, offering seasonal fruits that are refreshing and perfect for Halloween!
- A Glass of Apple Cider: This warm, spiced drink elevates the cozy autumn vibe, perfectly complementing the savory flavors of the Mini Mummy Pizzas.
- Popsicles for dessert: Go for festive Halloween popsicles made with fruit juice for a delightful touch of sweetness after the savory treats.
- Pumpkin Spice Hot Chocolate: Comforting and delicious, this warm drink is the perfect way to keep the festive spirit alive while enjoying your spooky snacks!
Expert Tips for Halloween Mini Mummy Pizzas
-
Toasting Option: Lightly toasting the English muffins before adding toppings enhances flavor and crispiness, elevating your Halloween Mini Mummy Pizzas.
-
Watch the Cheese: Keep a close eye on the baking process to prevent overcooking; you’re aiming for gooey, melted cheese without burning.
-
Creative Eyes: When using olives for eyes, ensure they are sliced thinly for better visibility and aesthetics. Consider blueberries for a playful twist if desired!
-
Make-Ahead Magic: Prep all ingredients in advance and store them separately in the fridge; this makes assembly quick and easy when Halloween festivities begin.
-
Serving Fresh: For optimal taste and texture, serve your Mini Mummy Pizzas immediately after baking; they’re best enjoyed warm and gooey!
How to Store and Freeze Halloween Mini Mummy Pizzas
-
Fridge: Store leftovers in an airtight container for up to 2 days. This will keep your Halloween Mini Mummy Pizzas fresh for snacking without compromising flavor.
-
Freezer: Feel free to freeze assembled pizzas in a single layer on a baking sheet, then transfer them to an airtight container for up to 2 months. Bake directly from frozen when you’re ready to enjoy!
-
Reheating: To restore crispy bases, reheat in a 350°F (175°C) oven for 3-4 minutes. This will ensure the cheese is melty and the edges are as delightful as when freshly baked.
-
Make-Ahead Tip: Assemble the Mini Mummy Pizzas ahead of time, cover, and refrigerate. Bake them just before serving for a quick party-ready snack that everyone will love!
Halloween Mini Mummy Pizzas Variations
Feel free to make these Mini Mummy Pizzas your own by experimenting with fun ingredients and flavors!
-
Dairy-Free: Substitute string cheese with vegan cheese strips or zucchini peels for a delightful twist. This way, everyone can join in on the spooky fun!
-
Different Bases: Swap English muffins for mini pita bread, crumpets, or even cauliflower crusts for a gluten-free option. Experimenting with bases can lead to a whole new yummy experience!
-
Sauce It Up: Consider using pesto or a tangy barbecue sauce instead of traditional pizza sauce to add unique flavors. These changes can make your Mummy Pizzas even more delightful for the taste buds!
-
Variety of Toppings: Top with colorful bell peppers, mushrooms, or even pepperoni slices for extra flavor and texture. Let your creativity shine through by mixing and matching your favorite toppings!
-
Sweet Surprise: For a playful Halloween twist, swap olives for fresh blueberries or apple slices as eyes. It adds a fruity surprise that pairs wonderfully with the savory elements of the pizza!
-
Spice It Up: For the heat lovers, throw in some sliced jalapeños or a sprinkle of crushed red pepper to your sauce before baking. A bit of spice can elevate this dish to a new level!
-
Make Them Mini: Create bite-sized versions using cocktail-sized English muffins or baby pita pockets. These are perfect for snacking at Halloween parties or school gatherings!
While indulging in these Mini Mummy Pizzas, consider trying some other festive treats like our Halloween Witch Cookies that pair perfectly with these spooky delights!
Make Ahead Options
These Halloween Mini Mummy Pizzas are a fantastic choice for meal prep, saving you time during the festivities! You can prepare all the ingredients—slicing the English muffins, spreading the pizza sauce, and layering the cheese—up to 24 hours in advance. Simply store each component in airtight containers in the refrigerator to maintain freshness. When you’re ready to bake, just assemble the ingredients, adding the olive slices for eyes before popping them into the oven. This way, you’ll have deliciously spooky snacks in no time, ready to impress your family or guests without the last-minute rush. Don’t worry; they’ll still be just as irresistible!

Halloween Mini Mummy Pizzas Recipe FAQs
How do I choose the right English muffins for my Mini Mummy Pizzas?
Absolutely! Look for English muffins that are fresh and free of dark spots or visible mold. Opt for those with a firm texture and a light golden color for the best results. If you’re looking for a more wholesome option, whole grain muffins can add a lovely nutty flavor.
Can I store leftovers of Mini Mummy Pizzas? How long will they last?
Yes, you can! Store any leftovers in an airtight container in the fridge for up to 2 days. To keep them enjoyable, make sure they are fully cooled before sealing them up. When you’re ready to snack on them again, reheating in a 350°F (175°C) oven for 3-4 minutes will help restore their original texture.
Can I freeze Mini Mummy Pizzas, and if so, how?
Absolutely! To freeze your Mini Mummy Pizzas, first assemble them and place them in a single layer on a baking sheet. Allow them to freeze for about 1-2 hours until firm, then transfer them to an airtight container or freezer bag. They can be stored for up to 2 months. When you’re ready to eat, bake directly from frozen at 220°C (430°F) for about 10-12 minutes, or until the cheese is molten and bubbly.
What should I do if my cheese is not melting properly?
Very good question! If your cheese isn’t melting as desired, it could be due to the type of cheese used. String cheese tends to melt well, but if you’re using a dairy-free option, ensure it’s a brand specifically designed for melting. To boost melting, cover your pizzas with foil for the first half of baking to trap steam, then remove it for the last few minutes for a beautiful golden finish.
Are there any dietary considerations I should be aware of?
Yes! If you have guests with allergies, be sure to verify that all your ingredients, especially the cheese and sauce, are free from common allergens like nuts or gluten. For dairy-free options, vegan cheese is a perfect alternative. If you’re looking to substitute for kids with fun dietary preferences, blueberries can easily be swapped for olives for a sweeter twist on the “eyes.”
Can I prepare the Mini Mummy Pizzas ahead of time for a party?
Definitely! You can prep all the ingredients in advance and store them separately in the fridge. Whether it’s toasting the muffins or pre-slicing olives, doing this will make assembling the pizzas a breeze when it’s time to bake. Just remember to assemble and bake them before serving to keep them warm and cheesy!
Delicious Halloween Mini Mummy Pizzas Perfect for Spooky Fun
Ingredients
Equipment
Method
- Preheat your oven to 220°C (430°F).
- Slice the English muffins in half and place them cut side up on a lined baking sheet.
- Spread pizza sauce evenly across each muffin half.
- Unwrap and pull apart the string cheese into strips. Layer over the sauce to resemble mummy wrappings, leaving space at the top for eyes.
- Place two olive slices in the gap at the top of each muffin half for the eyes.
- Bake the pizzas for about 5-10 minutes until the cheese is melted and bubbly.
- Let the pizzas cool for a few minutes before serving.
Leave a Reply