
As I stood in my kitchen, the enticing aroma of freshly baked honey cake wafted through the air, instantly transporting me to the sun-soaked streets of Russia. The star of today’s recipe is the beloved Russian Honey Cake, or Medovik, a dessert that epitomizes warmth and tradition. With its delicate layers and creamy filling, it’s not just a feast for the stomach but a cherished memory waiting to be created. This traditional treat is not only perfect for holiday celebrations but also a delightful way to impress friends and family at any gathering. Plus, its make-ahead nature means less stress when company arrives! Are you ready to dive into the world of baking with me and explore how to craft this luscious layered masterpiece?
Why is Russian Honey Cake So Special?
Delicate layers: Each slice of this cake is a testament to the art of layering, creating a beautiful presentation that will impress any guest.
Sweet memories: This traditional dessert not only tastes divine, but also evokes nostalgia and warmth, making it perfect for family gatherings or festive celebrations.
Versatile flavors: Whether you prefer classic honey or wish to experiment with flavors, this recipe allows for delightful variations, such as adding chocolate or using flavored extracts.
Make-ahead: Save time on the day of your event! Prepare it in advance, allowing the flavors to meld for an even more exquisite taste.
Perfect pairing: Serve with a strong cup of tea or coffee for a balancing contrast; or, elevate it with fresh berries or whipped cream for an indulgent twist.
Russian Honey Cake Ingredients
For the Cake Layers
- All-purpose flour – Provides structure for the cake layers; substitute with whole wheat flour for added nutrients and a nutty flavor.
- Granulated sugar – Sweetens the cake; can be adjusted according to taste preference.
- Unsalted butter – Enriches the dough for a tender texture; ensure butter is at room temperature for best mixing.
- Honey – Natural sweetener that adds moisture and a distinct flavor; use lighter varieties like clover or wildflower honey.
- Eggs – Provide moisture and structure; use large, fresh eggs at room temperature for even incorporation.
- Baking soda – Acts as a leavening agent for airy layers; essential for proper texture.
- Ground cinnamon – Adds warmth and complexity; can be omitted or substituted with nutmeg if desired.
For the Cream Filling
- Sour cream – Adds tanginess and moisture to both the cake and cream filling; Greek yogurt may be used as a substitute.
- Heavy cream – Used for whipping into a creamy filling; light cream can be used for a lighter texture.
- Powdered sugar – Sweetens and stabilizes the cream filling; adjust sweetness according to preference.
- Vanilla extract – Enhances flavor profile; always use pure vanilla for optimal taste.
Optional Garnishes
- Crushed walnuts or almonds – Provides garnish and additional texture; can be omitted for nut-free versions.
- Honey drizzle – For an extra touch of sweetness and decoration; exclude for a less sweet finish.
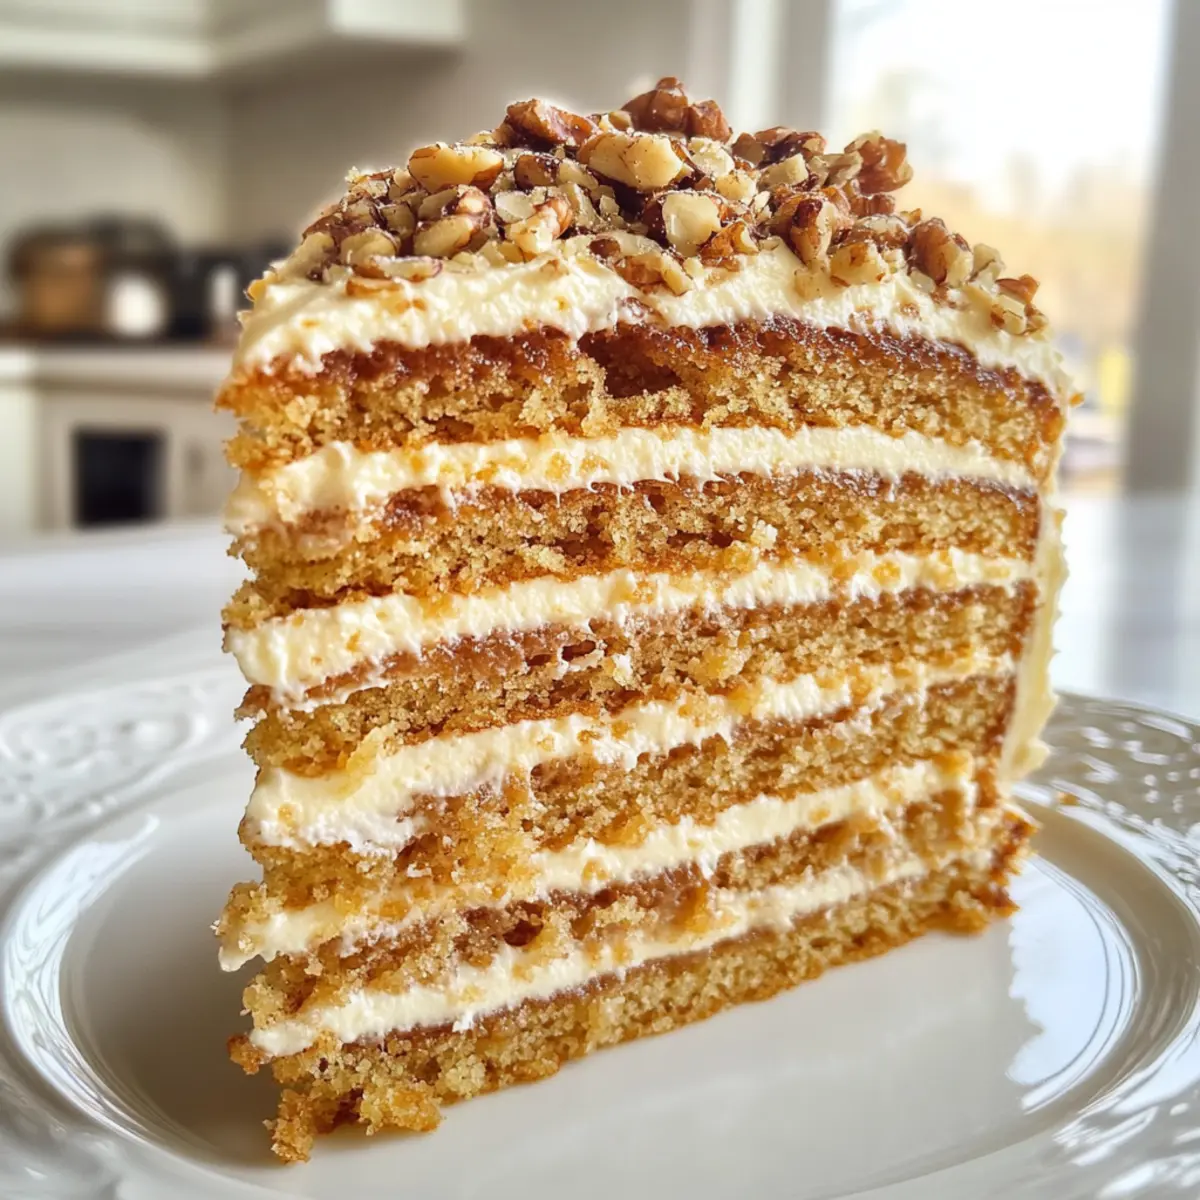
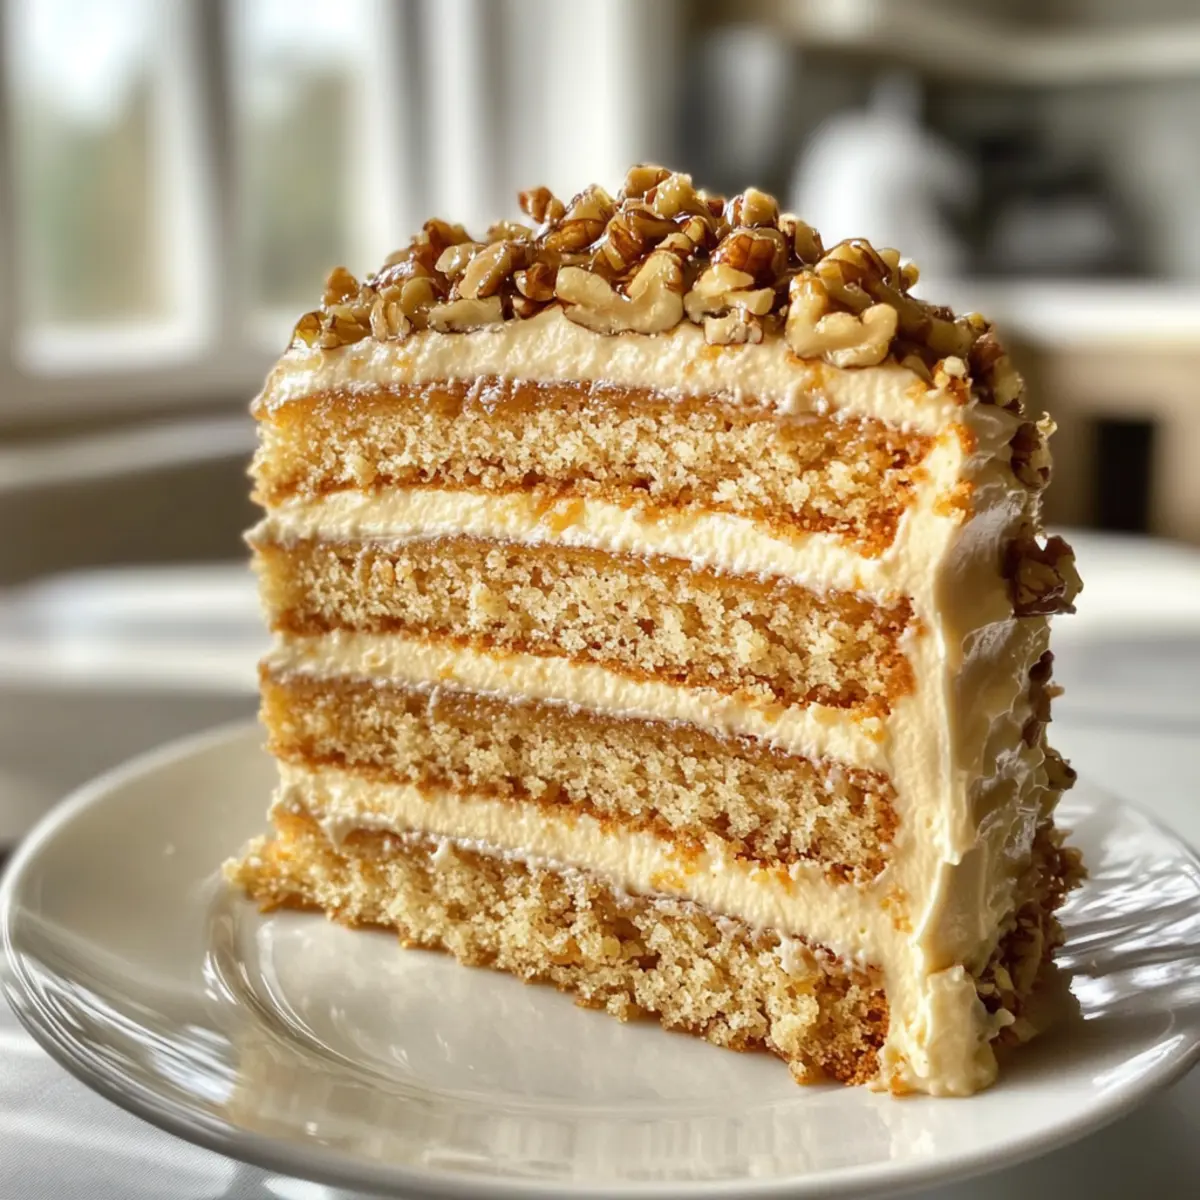
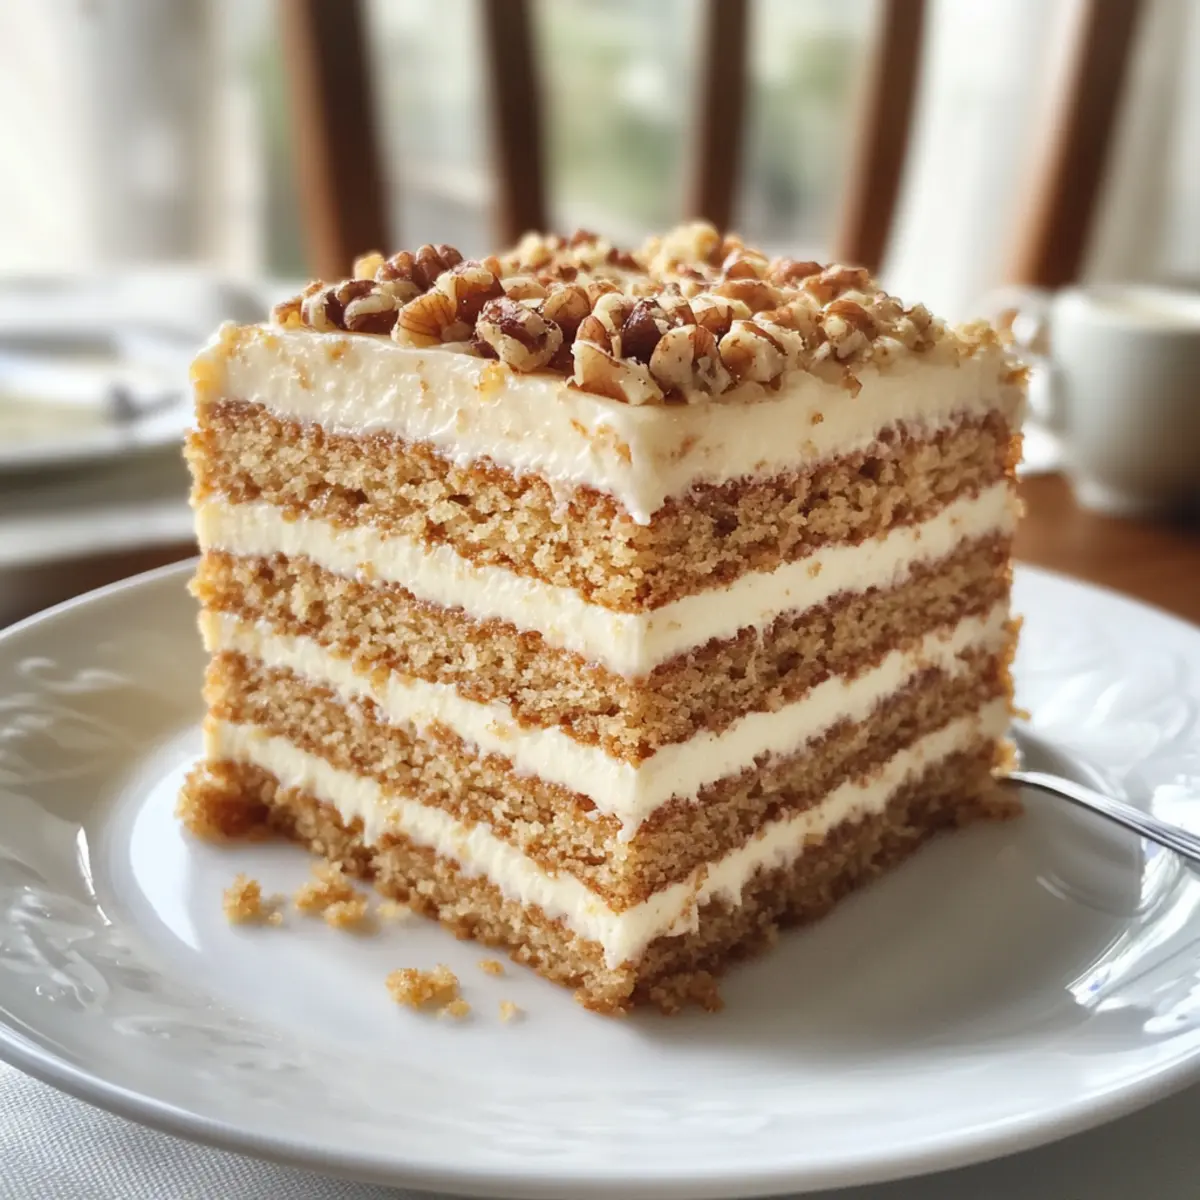
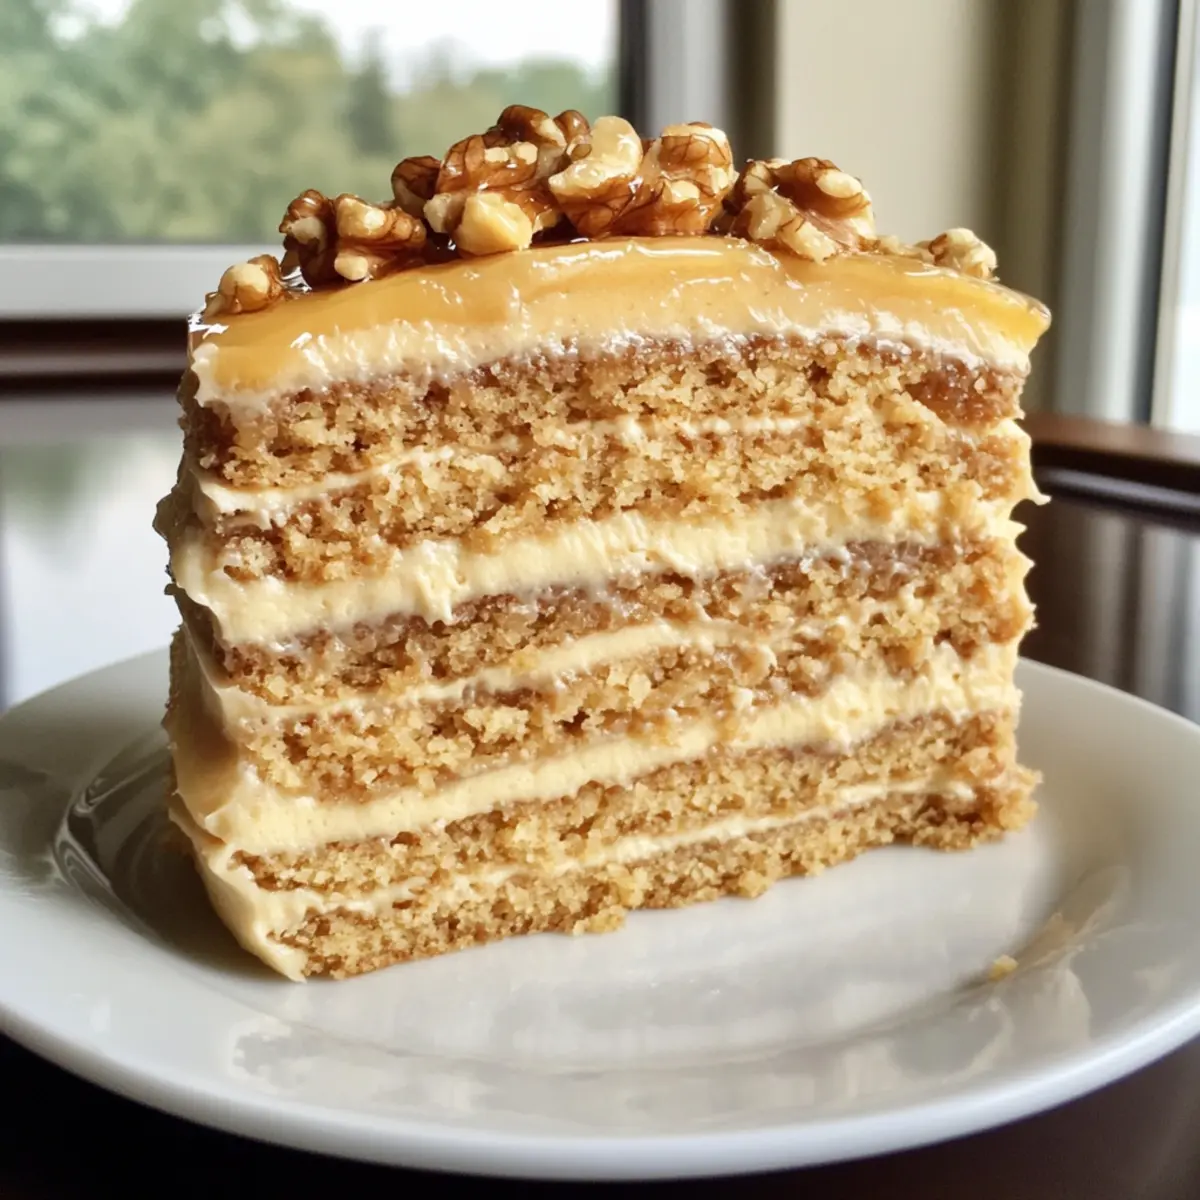
This delightful Russian Honey Cake is not only a treat for the taste buds but also an invitation to a journey of warmth and celebration.
Step‑by‑Step Instructions for Russian Honey Cake
Step 1: Preheat Oven
Begin by preheating your oven to 350°F (175°C). This crucial step prepares the environment for perfect baking, ensuring each layer of the Russian Honey Cake rises beautifully. Make sure to set a timer so you don’t forget as you move on to preparing the dough.
Step 2: Make the Dough
In a large mixing bowl, beat together softened unsalted butter, granulated sugar, and honey until the mixture is light and fluffy, approximately 5 minutes. Gradually add in the eggs, one at a time, mixing until well incorporated. In a separate bowl, whisk together the all-purpose flour, baking soda, and ground cinnamon, then combine the dry ingredients with the wet mixture to form a soft dough.
Step 3: Roll and Cut
Once your dough is ready, divide it into eight equal portions. On a lightly floured surface, roll out each portion to about 1/8 inch thick. Using a round cutter, cut out circles from the rolled dough; these will become the layers of your Russian Honey Cake. Aim for uniform shapes for even baking.
Step 4: Bake Layers
Carefully transfer the cut dough circles onto lined baking sheets, ensuring they don’t touch. Bake in your preheated oven for about 5-7 minutes, or until the edges turn golden and fragrant. Keep a close eye on them, as they can brown quickly. Once baked, remove them from the oven and allow to cool on wire racks.
Step 5: Prepare Cream Filling
While the cake layers cool, prepare your cream filling. In a mixing bowl, whip the chilled heavy cream until soft peaks form. Then, gently fold in the sour cream, powdered sugar, and vanilla extract to create a smooth and fluffy mixture. Ensure your bowl and beaters are cold to achieve maximum volume in your filling.
Step 6: Assemble Cake
To assemble your Russian Honey Cake, take one baked layer and spread a generous amount of the cream filling evenly on top. Repeat this process, stacking the layers with cream between each one until all layers are used. Once assembled, cover the entire cake with the remaining cream filling for a beautifully silken finish.
Step 7: Chill
Place the layered cake in the refrigerator to chill for at least 6 hours, or ideally overnight. This not only helps the cake set but allows the flavors to meld beautifully, enhancing the overall taste experience of your Russian Honey Cake.
Step 8: Garnish & Serve
Just before serving, you can add an optional garnish. Sprinkle the top with crushed walnuts or almonds for an added crunch and an elegant touch. Drizzle a bit of honey on top for extra sweetness. Serve chilled, and watch the smiles share the joy of this delicious dessert!
Expert Tips for Russian Honey Cake
-
Use Room Temperature Ingredients: Ensure butter and eggs are at room temperature to achieve a smooth, well-mixed batter for your Russian Honey Cake.
-
Watch Baking Time: Check the cake layers frequently while they bake; overbaking can lead to dry layers that are hard to stack and spread with cream.
-
Chill Everything: For optimal cream filling consistency, chill your heavy cream, bowl, and beaters before whipping. This will make your filling light and fluffy.
-
Don’t Skimp on Chilling: Allow the assembled cake to chill overnight if possible. This step is crucial for flavors to meld and the cake to set properly.
-
Experiment with Flavors: Feel free to try different extracts or incorporate cocoa for a chocolate variation, adding a unique twist to the classic Russian Honey Cake.
How to Store and Freeze Russian Honey Cake
- Fridge: Store the Russian Honey Cake in an airtight container for up to 5 days. This keeps the layers moist and the cream filling fresh.
- Freezer: For longer storage, wrap the assembled cake tightly in plastic wrap and then in aluminum foil. It can be frozen for up to 3 months.
- Thawing: To enjoy your frozen cake, transfer it to the fridge for 6-8 hours or overnight to thaw gradually, maintaining its texture and flavor.
- Reheating: While it’s not typically served warm, if desired, you can let the chilled cake sit at room temperature for about 30 minutes before serving for a perfect slice.
What to Serve with Russian Honey Cake
Indulging in a slice of this delicate honey cake is just the beginning; let’s craft a delightful spread to complement it.
- Strong Black Tea: The bold flavors in black tea enhance the sweetness of the honey cake, creating a harmonious balance.
- Fresh Berries: Adding a burst of color and flavor, fresh berries provide a refreshing contrast to the rich, creamy layers.
- Whipped Cream: A dollop of luscious whipped cream adds airiness and extra creaminess, elevating each bite of the cake.
A warm cup of tea paired with the honey cake is like an embrace for your taste buds; it’s simply comforting.
- Chocolate Ganache Drizzle: For a luxurious touch, a silky chocolate ganache can be drizzled on top, introducing an indulgent richness that pairs beautifully.
- Ice Cream: Creamy vanilla or honey-flavored ice cream complements the cake’s texture, making each spoonful a delightful treat.
- Nuts: Crushed walnuts or almonds sprinkled on top add a delightful crunch, enhancing both texture and visual appeal.
For a special twist, serve this cake alongside some saffron-infused milk tea to explore unique flavors that create an unforgettable experience.
Make Ahead Options
These Russian Honey Cake layers are fantastic for meal prep! You can prepare the cake layers up to 3 days in advance; simply bake, cool, and store them in an airtight container in the refrigerator. The cream filling can also be made ahead and stored separately for up to 2 days. When you’re ready to serve, assemble the layers with the cream filling, allowing the cake to chill for at least 6 hours or overnight for optimal flavor melding. This make-ahead approach not only saves you precious time on the day of your event but also ensures your Russian Honey Cake remains just as delicious and beautifully layered.
Variations & Substitutions for Russian Honey Cake
Feel free to personalize this delightful Russian Honey Cake to match your tastes and dietary needs, bringing even more joy to every slice!
-
Dairy-Free: Substitute heavy cream with coconut cream and sour cream with a dairy-free yogurt for a lactose-free version. This will still provide a rich and creamy filling that everyone can enjoy.
-
Gluten-Free: Use a 1:1 gluten-free flour blend in place of all-purpose flour for an equally delicious treat that caters to gluten sensitivities. Your guests won’t even miss the gluten!
-
Sugar-Free: For a healthier twist, replace granulated sugar with your favorite sugar substitute, adjusting the quantity based on sweetness preference. This variation lets you indulge without guilt!
-
Chocolate Lovers: Incorporate 2 tablespoons of cocoa powder into the dough for a deliciously rich chocolate version of the Russian Honey Cake. This irresistible combination will satisfy any chocolate craving.
-
Nutty Flavor: Experiment with adding finely chopped hazelnuts or pecans to the cream filling for a delightful crunch that adds both texture and flavor. The nuttiness complements the sweetness beautifully.
-
Fruit-Infused: Fold in a cup of pureed fresh raspberries or strawberries into the cream filling for a fruity explosion. The tartness will enhance the overall creaminess and offer a burst of flavor in every bite.
-
Spiced Up: Add a dash of ginger or cardamom to the dough for a seasonal twist that gives your cake a unique and warming flavor profile. These spices pair wonderfully with honey and will tantalize your taste buds.
-
Whipped Cream Alternative: If you want a lighter filling, swap the heavy cream for whipped coconut cream or a whipped aquafaba to keep the dessert airy and light. This modification caters to those looking for a fluffier option.
As you embark on this baking journey, don’t forget to take a look at my Sweet Harmony Honey and Honey Butter Skillet recipes for more sweet inspirations!
Russian Honey Cake Recipe FAQs
How do I select the right honey for Russian Honey Cake?
Absolutely! For the best flavor in your Russian Honey Cake, opt for lighter varieties such as clover or wildflower honey. These types provide a sweet, delicate flavor without overpowering the cake’s characteristics. Avoid dark honey as it can be too strong and may overshadow the subtle notes of the cake.
How do I store my Russian Honey Cake?
Store the Russian Honey Cake in an airtight container in the refrigerator for up to 5 days. This will keep the layers moist and the creamy filling fresh. I often place a piece of parchment paper between the cake and the lid to prevent sticking and ensure it stays pristine.
Can I freeze Russian Honey Cake?
Yes, you can freeze your Russian Honey Cake! Wrap the assembled cake tightly in plastic wrap first, followed by aluminum foil to prevent freezer burn. It can be stored for up to 3 months. When ready to enjoy, transfer it to the fridge for about 6-8 hours or overnight to thaw gradually, preserving its texture and flavor.
What should I do if my cake layers come out too dry?
If your cake layers turn out too dry, don’t worry, it happens! You can brush the layers lightly with a sweetened milk or honey syrup just before assembly. Simply mix equal parts water and honey to create a syrup, and apply it with a pastry brush to each layer. This will add moisture and enhance the overall flavor.
Are there any dietary considerations when making Russian Honey Cake?
Very much so! If you’re catering to nut allergies, you can easily omit the optional crushed walnuts or almonds. Additionally, if you’re baking for someone with lactose intolerance, consider using lactose-free sour cream and heavy cream in the filling. For a vegan alternative, you may explore plant-based substitutes for honey such as agave syrup and use aquafaba to replace eggs. Always check the specific dietary needs of your guests for the best experience!
Irresistibly Moist Russian Honey Cake for Sweet Celebrations
Ingredients
Equipment
Method
- Preheat your oven to 350°F (175°C).
- Beat together softened butter, sugar, and honey until light and fluffy, about 5 minutes. Gradually add eggs.
- In a separate bowl, whisk together flour, baking soda, and cinnamon. Combine with wet mixture to form dough.
- Divide the dough into 8 portions and roll out each to about 1/8 inch thick. Cut out circles for cake layers.
- Bake the cut circles on lined baking sheets for about 5-7 minutes until golden. Cool on wire racks.
- Whip heavy cream until soft peaks form. Fold in sour cream, powdered sugar, and vanilla extract to create filling.
- Assemble the cake by stacking baked layers with cream filling in between. Cover entire cake with remaining filling.
- Chill the assembled cake in the refrigerator for at least 6 hours or overnight.
- Before serving, garnish with crushed nuts and a drizzle of honey.
Leave a Reply