
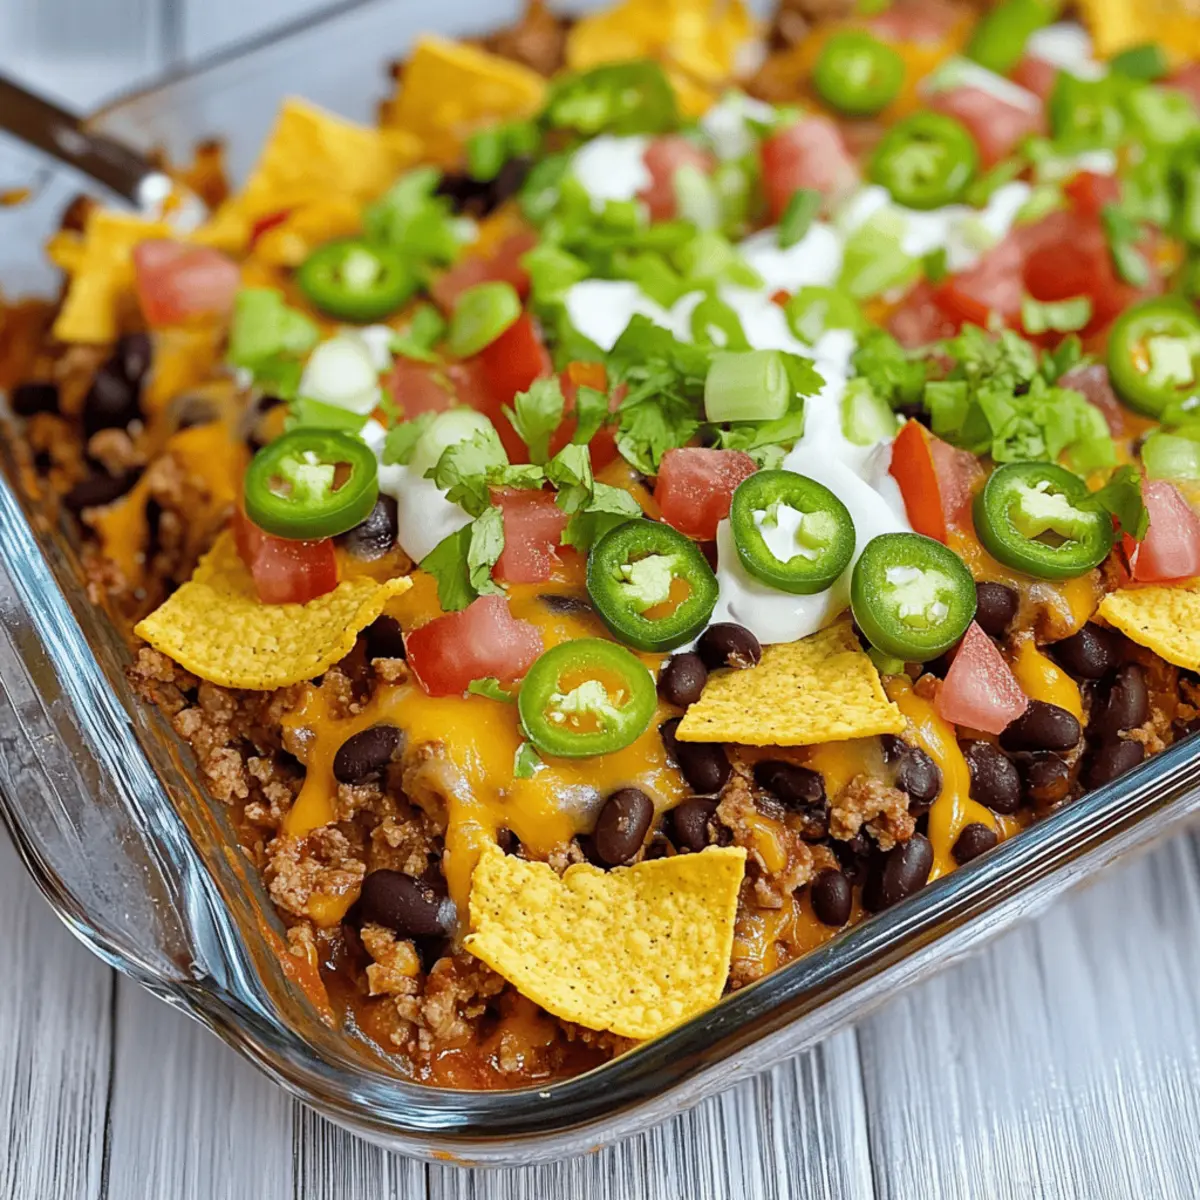
“Did you hear about the latest twist on taco night?” I overheard a friend say this while picking up groceries, and it piqued my curiosity. Enter the Walking Taco Casserole—a scrumptious blend of seasoned ground beef, hearty beans, and crunchy Fritos, all topped with ooey-gooey melted cheese. As a passionate home chef, I love how this easy weeknight meal not only brings the flavors of traditional walking tacos to the table but also eliminates the mess of assembling them individually. Not to mention, it’s a surefire crowd-pleaser that’s customizable with your favorite toppings. Whether you’re hosting taco night with the family or simply craving something comforting without hours of prep, this casserole is the answer! What unique toppings will you add to your version?
Why Will You Love This Casserole?
Easy Preparation: With just a few simple steps, this casserole comes together quickly, making it perfect for busy weeknights.
Flavor Explosion: Each bite brings a delicious mix of seasoned beef, savory beans, and gooey cheese that’s reminiscent of classic tacos.
Customizable Delights: Add your favorite toppings like guacamole or jalapeños for a personalized touch that everyone will love.
Crowd-Pleasing Appeal: It’s easy to serve and share, making it an ideal dish for families or gatherings—no one will leave hungry!
Leftover Friendly: This recipe keeps well in the fridge and is freezer-friendly, ensuring that delicious meals continue long after taco night.
Check out our Chicken Alfredo Casserole for another winning weeknight dish!
Walking Taco Casserole Ingredients
For the Casserole
• Ground Beef – Provides the protein base; lean options can reduce fat.
• Onion – Adds savory depth; finely chop for even cooking.
• Taco Seasoning – A flavor enhancer with classic spices; try homemade for a personal touch.
• Water – Helps dissolve the taco seasoning for a cohesive filling.
• Black Beans – Delivers fiber and texture; kidney or pinto beans work too.
• Diced Tomatoes with Green Chiles – Infuses moisture and flavor; omit chiles for milder taste.
• Sour Cream – Adds creaminess; Greek yogurt is a lighter substitute.
• Fritos Corn Chips – Creates a crunchy layer at the bottom and topping; Doritos can add a different flavor.
• Mexican-Style Shredded Cheese – Melts beautifully for gooey texture; Monterey Jack or cheddar are good substitutes.
For the Toppings
• Green Onions – For a fresh crunch and pop of color.
• Guacamole – Adds creaminess and richness; a must-have for avocado lovers!
• Salsa – Packs a flavorful punch; choose mild or spicy based on preference.
• Jalapeños – Adds heat and zest; perfect for those who like it spicy!
With these ingredients, you’ll create a tasty and satisfying Walking Taco Casserole that the whole family will adore!
Step‑by‑Step Instructions for Walking Taco Casserole
Step 1: Preheat the Oven and Prepare the Dish
Begin by preheating your oven to 350°F (175°C). While it’s heating, take a 13×9 baking dish and spray it generously with nonstick cooking spray. This ensures that your delicious Walking Taco Casserole will come out easily once it’s baked, allowing for perfect serving without a mess.
Step 2: Brown the Meat and Onions
In a large skillet over medium heat, add the ground beef and diced onion, cooking until the meat is browned and the onion is softened, about 6-8 minutes. Make sure to stir occasionally to break up the beef and evenly brown it. Once cooked, drain any excess fat to keep your casserole from becoming greasy.
Step 3: Add Seasoning and Water
Next, stir in your taco seasoning along with 1 cup of water, bringing the mixture to a gentle boil. Keep stirring for about 2-3 minutes until the water evaporates slightly and the seasoning is well incorporated. This step infuses the beef with robust flavors that are essential for your Walking Taco Casserole.
Step 4: Mix in Additional Ingredients
Reduce the heat to low and mix in the black beans, diced tomatoes with green chiles, and sour cream until the mixture is heated through, about 3-4 minutes. This adds creaminess and richness to your filling, enhancing the overall flavor profile of the casserole.
Step 5: Layer the Casserole
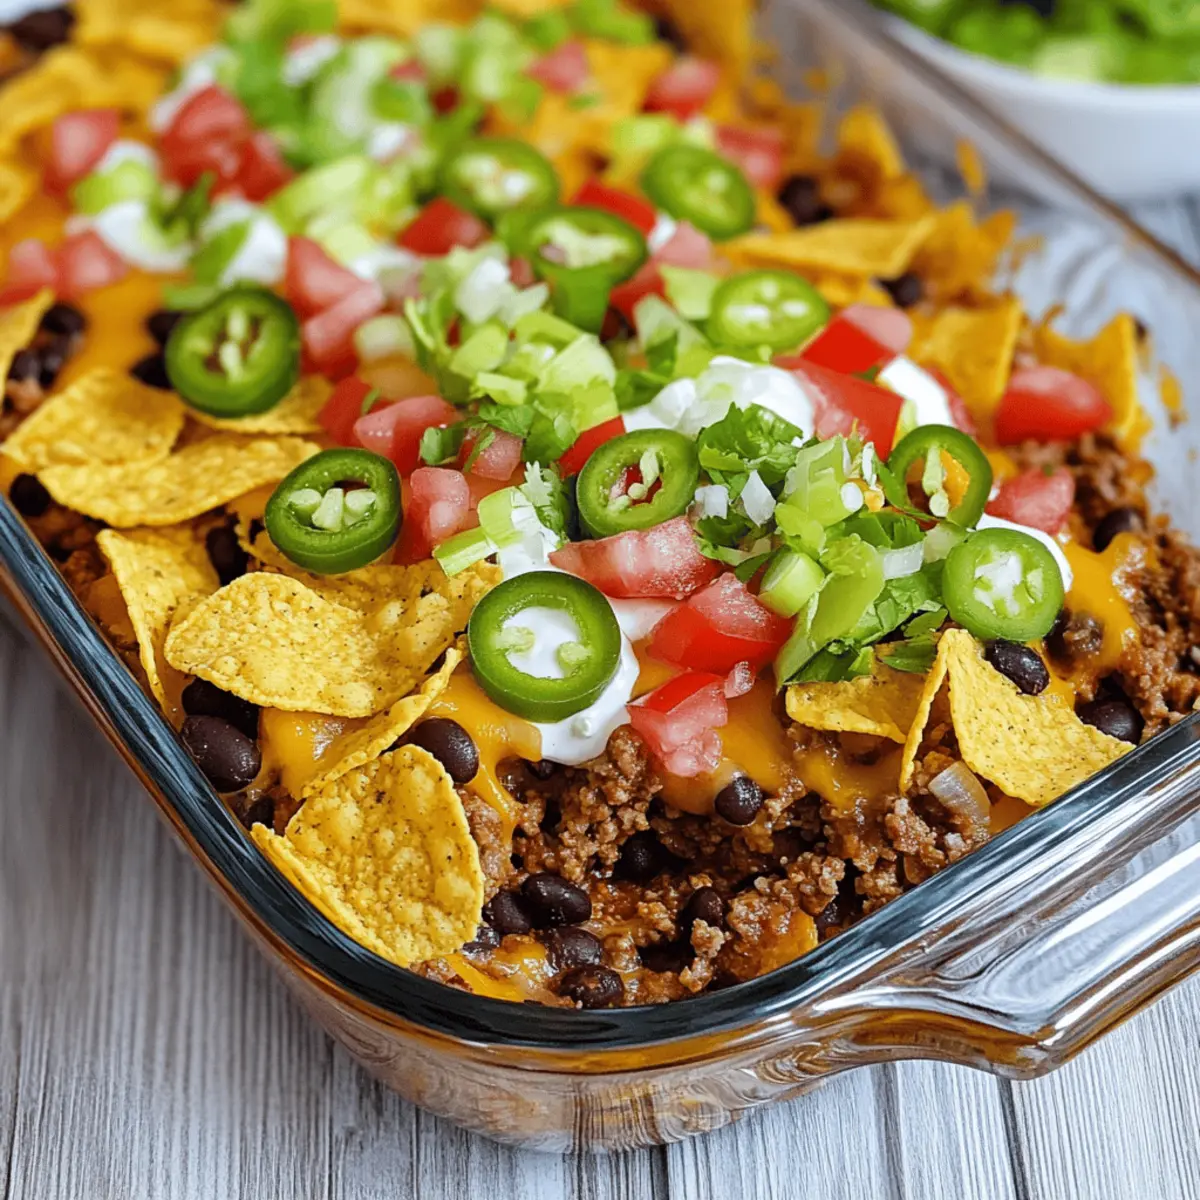
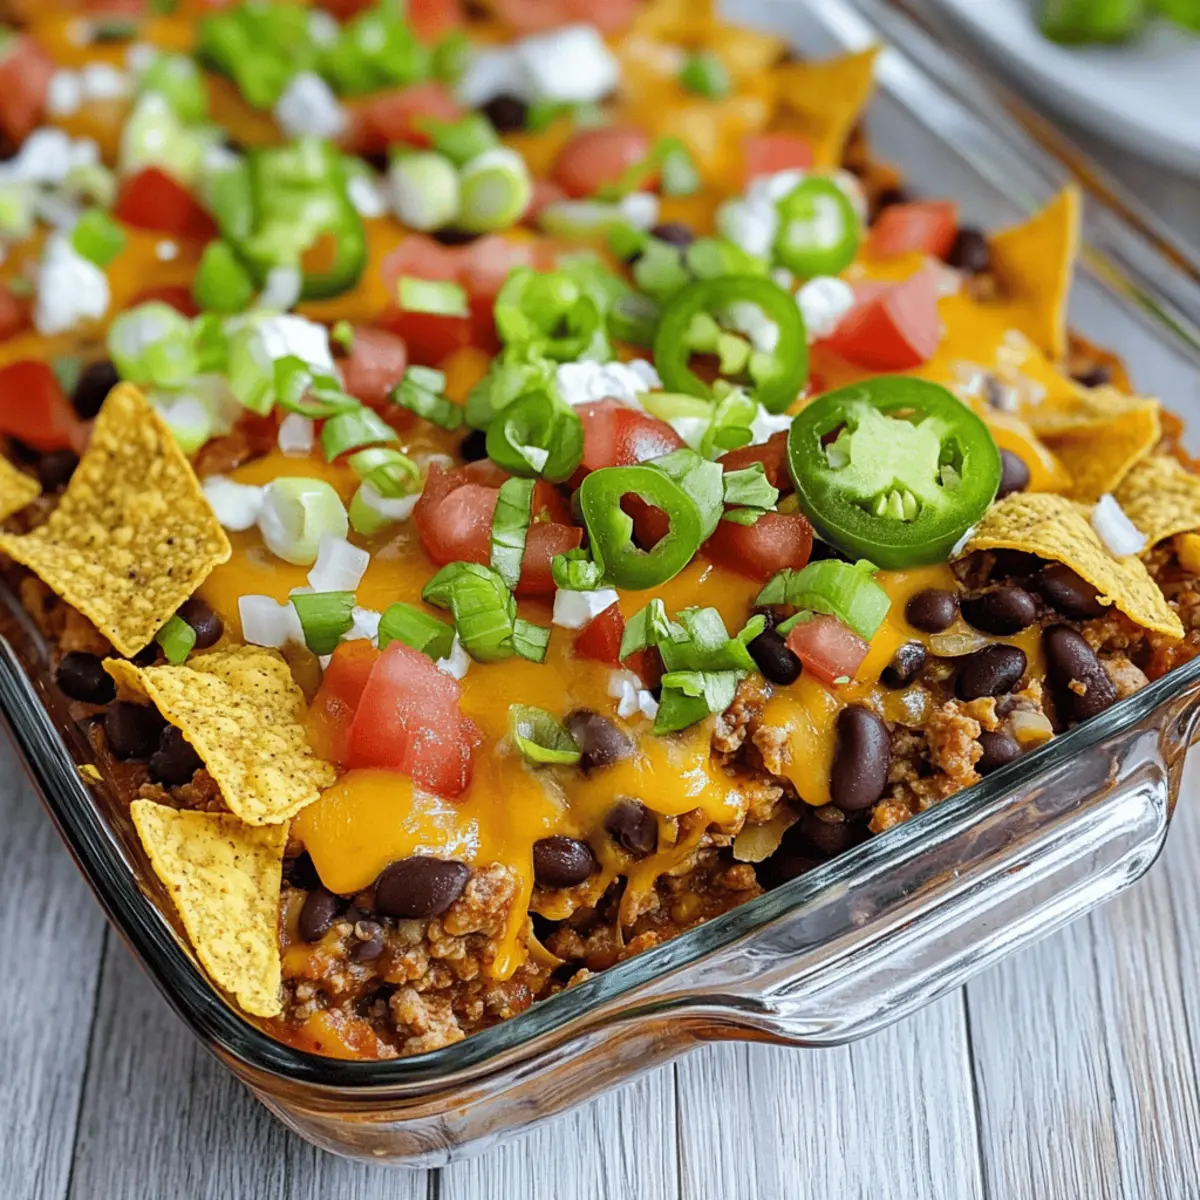
To assemble, layer the bottom of your prepared baking dish with Fritos to create a crunchy base. Next, spoon half of the beef mixture over the Fritos, followed by a generous layer of shredded cheese. Repeat with another layer of Fritos, the remaining beef mixture, and top with the rest of the cheese.
Step 6: Bake the Casserole
Cover the dish tightly with aluminum foil and place it in the preheated oven. Bake for 15 minutes to allow the flavors to meld together. After that, remove the foil and let it bake for an additional 5 minutes or until the cheese is bubbly and starts to turn golden brown.
Step 7: Serve and Garnish
Once baked, take the Walking Taco Casserole out of the oven and let it sit for a few minutes to cool slightly. Serve it hot, garnished with additional Fritos and your choice of toppings like green onions, guacamole, or salsa for a vibrant and flavorful finish.
What to Serve with Walking Taco Casserole
As you dive into this savory adventure, consider balancing flavors and textures to create a satisfying meal the whole family will adore.
- Mexican Rice: This fluffy side introduces warm spices, making it a perfect complement to the bold flavors of the casserole.
- Fresh Garden Salad: Crisp greens topped with tangy vinaigrette add a refreshing contrast to the rich and cheesy casserole. Mix in some avocado slices for extra creaminess!
- Guacamole: Creamy and rich, guacamole enhances the casserole with its smooth texture, providing a delicious dip for extra Fritos.
- Spicy Salsa: A zesty salsa delivers a burst of flavor and a kick of heat, bringing a lively element that pairs especially well with the melted cheese.
- Corn on the Cob: Sweet, juicy corn grilled or roasted brings a delightful crunch, adding a touch of sweetness that balances the savory casserole.
- Churros for Dessert: End the meal with these crispy, cinnamon-sugar-coated treats that offer a delectable sweetness, creating a perfect finale to your taco night!
Experiment with these pairings to see which combinations become your family’s new favorites!
How to Store and Freeze Walking Taco Casserole
Fridge: Store leftover Walking Taco Casserole in an airtight container for up to 4 days, ensuring it stays fresh and ready for quick reheating.
Freezer: For longer storage, freeze the casserole for up to 3 months. Wrap it tightly in plastic wrap followed by aluminum foil to prevent freezer burn.
Reheating: When ready to enjoy, thaw in the refrigerator overnight, then reheat in the oven at 350°F (175°C) until heated through, about 20-25 minutes.
Make-Ahead: You can prepare the casserole in advance and keep it in the fridge before baking. Just remember to add an additional 5-10 minutes to the baking time if refrigerated.
Expert Tips for Walking Taco Casserole
- Lean Meat Choice: Opt for lean ground beef to cut down on grease. Ground turkey or chicken make for lighter, yet flavorful alternatives.
- Seasoning Savvy: Allow the beef mixture to cool slightly before layering with cheese to prevent a soggy casserole. It keeps that delightful texture intact!
- Custom Toppings: Get creative with taco toppings like olives or extra cheese to cater to everyone’s taste buds. Personalization is the key to a successful Walking Taco Casserole!
- Storage Solutions: Cool leftovers before refrigerating. Use airtight containers to maintain freshness, so you can enjoy this tasty dish for days to come.
- Make-Ahead Option: For extra ease on busy nights, assemble the casserole in advance. Refrigerate before baking, adding 5-10 minutes to the cooking time.
Walking Taco Casserole Variations
Feel free to let your creative juices flow and customize this casserole to suit your taste buds!
- Meat-Free: Swap ground beef for black beans or lentils for a satisfying vegetarian option. Your casserole will still be hearty and delicious!
- Spicier Kick: Add diced jalapeños directly into the meat mixture or sprinkle crushed red pepper flakes on top before baking for extra heat.
- Creamy Twist: Substitute sour cream with creamy avocado or guacamole for a luscious and healthy alternative. It adds a rich flavor that’s hard to resist.
- Cheese Lovers: Mix in your favorite cheese varieties, like pepper jack for a spicy kick or feta for a tangy twist. Each option adds unique flavors!
- Crunchy Toppings: Before serving, sprinkle crushed tortilla chips or extra Fritos on top for an added crunch. It’s like a fiesta in every bite!
- Fresh Greens: Top the casserole with fresh chopped cilantro or arugula before serving to bring a burst of color and freshness that will elevate your dish.
- Flavor Booster: Use homemade taco seasoning for a personalized blend of spices tailored to your family’s taste preferences. It’s a simple swap that makes a big difference!
- Served with a Side: Pair this casserole with a refreshing side salad or Mexican rice to round out your meal. It balances the flavors perfectly and adds variety.
For more deliciously comforting recipes, don’t miss our Chicken Rice Casserole or the irresistible Sweet Harmony Casserole!
Make Ahead Options
These Walking Taco Casserole preparations are fantastic for meal prep enthusiasts! You can assemble the entire casserole up to 24 hours in advance before baking. Simply prepare as instructed, but instead of baking it right away, cover it tightly with foil and refrigerate. When you’re ready to enjoy, just add an extra 5-10 minutes to the baking time to ensure it’s heated through and the cheese is bubbly. To maintain quality, let the casserole cool slightly before refrigerating and keep it covered to prevent drying out. Trust me, this dish will come out just as delicious, saving you valuable time on busy weeknights!

Walking Taco Casserole Recipe FAQs
What type of ground beef should I use for the casserole?
Absolutely! I recommend using lean ground beef to keep your casserole lighter. However, ground turkey or chicken also makes a fantastic substitute for a healthier option without losing that savory flavor.
How should I store the leftovers, and how long will they last?
It’s best to store your leftover Walking Taco Casserole in an airtight container in the fridge. It will stay fresh for up to 4 days, making it easy to enjoy for lunch or dinner again!
Can I freeze the Walking Taco Casserole?
Yes, indeed! For freezing, wrap the casserole tightly in plastic wrap and then cover with aluminum foil to prevent freezer burn. This way, you can freeze it for up to 3 months. When you’re ready to dig in, just thaw it overnight in the fridge and reheat in the oven at 350°F (175°C) until hot, usually about 20-25 minutes.
What if my casserole mixture gets soggy?
If your casserole starts to get soggy, make sure to allow the beef mixture to cool slightly before layering it with cheese. This will help maintain that satisfying texture. Also, don’t forget that layering Fritos at the bottom will give you a great crunchy base!
Are there any dietary considerations I should know about?
Absolutely! The Walking Taco Casserole can be adjusted for various dietary needs. If someone has a gluten allergy, opt for gluten-free Fritos or tortilla chips. Similarly, if you have lactose intolerance, use dairy-free cheese and yogurt alternatives to keep it friendly for everyone at the table.
What toppings should I use?
The beauty of this casserole is how customizable it is! Popular toppings include green onions, guacamole, salsa, and jalapeños. Get creative and tailor the toppings to match your family’s taste—for a bit more zing, I often add diced avocado or fresh cilantro!
Walking Taco Casserole: A Fun Family Dinner Delight
Ingredients
Equipment
Method
- Preheat your oven to 350°F (175°C) and prepare a 13x9 baking dish with nonstick cooking spray.
- In a large skillet over medium heat, brown the ground beef and onions for about 6-8 minutes.
- Stir in taco seasoning and 1 cup of water, bring to a gentle boil and cook for 2-3 minutes.
- Mix in black beans, diced tomatoes with green chiles, and sour cream; heat through for 3-4 minutes.
- Layer Fritos at the bottom of the baking dish, followed by half of the beef mixture and then shredded cheese. Repeat layers.
- Cover with aluminum foil and bake for 15 minutes, then uncover and bake for an additional 5 minutes until cheese is bubbly.
- Let cool slightly, then serve with additional Fritos and desired toppings.
Leave a Reply