
As I stood in my kitchen, the faint sounds of Halloween festivities echoed outside, a reminder that this spooky season is all about creativity and fun. That’s when the idea struck me: DIY Mini Halloween Pizzas! These delightful bites offer an easy-to-make, customizable treat that’s perfect for both parties and family gatherings. With playful designs like ghosts, mummies, and jack-o’-lanterns, they’re bound to spark joy and laughter in young and old alike. Plus, they pack a savory punch that’s comforting while being a great way to involve kids in the kitchen. Are you ready to create some magical memories this Halloween with these whimsical pizzas? Let’s dive into the fun!
Why Are Mini Halloween Pizzas a Must-Try?
Fun and Creative: Get ready to unleash your inner artist! These mini Halloween pizzas let you play with toppings and designs, allowing everyone to express their creativity, from kids to adults.
Easy to Make: With just a few simple ingredients, you’ll have a festive treat ready in no time. Spend less time cooking and more time enjoying the Halloween festivities!
Customizable for All Tastes: Whether you prefer traditional pepperoni or a veggie-packed delight, these pizzas cater to any palate. You can easily substitute ingredients to fit dietary needs, like opting for gluten-free crusts or different cheese blends.
Crowd-Pleasing Appeal: These spooktacular snacks are perfect for any gathering, ensuring smiles and satisfied appetites all around! Pair them with festive drinks, like Halloween Witch Cookies, to complete the theme.
Kid-Friendly Activity: Involve the little ones in the kitchen! Assembling mini pizzas together makes for a delightful bonding experience, filled with laughter and delicious results.
Transform your Halloween into a memorable celebration with these DIY Mini Halloween Pizzas that everyone will love!
Mini Halloween Pizzas Ingredients
Get ready for some spooky pizza fun!
For the Crusts
- Mini Pizza Crusts – Ideal for creating individual servings; use store-bought for ease or make your own for a personal touch.
For the Sauce
- Pizza Sauce – The flavorful base that brings it all together; consider garlic butter or pesto for a tasty twist.
For the Toppings
- Shredded Mozzarella Cheese – The main cheese addition for melt-in-your-mouth deliciousness; mixing in cheddar offers a new flavor profile.
- Mozzarella Cheese Slices – Perfect for crafting ghost shapes on your spooky mini pizzas; any cheese slice works wonders for aesthetics.
- Pepperoni Slices – Bring savory goodness and versatility, doubling as spooky characters; turkey pepperoni or other deli meats add unique flavors.
- Black Olives – Create “eyes” for your ghostly and mummy-themed pizzas; capers or small cheese balls can also be fun substitutes for different effects.
- Orange Bell Pepper – Cut into playful shapes for jack-o’-lantern faces; carrots or zucchini can provide a colorful spin on your designs.
Get ready to enjoy the delightful experience of making these fun and customizable Mini Halloween Pizzas that will be a hit at your celebrations!
Step‑by‑Step Instructions for Mini Halloween Pizzas
Step 1: Preheat the Oven
Begin by preheating your oven to 400°F (200°C). While the oven heats up, take a large baking sheet and line it with parchment paper to prevent sticking. This will ensure your delicious mini Halloween pizzas cook evenly and release easily once baked.
Step 2: Arrange the Crusts
Next, place your mini pizza crusts on the prepared baking sheet, allowing some space between each one. Arrange them with care, as these will be the canvas for your spooky creations. The crusts should be golden and crisp once they’re out of the oven; make sure they are evenly spread across the baking sheet for optimal baking.
Step 3: Spread the Sauce
Evenly spread a generous layer of pizza sauce across each mini pizza crust, using a spoon or spatula for smooth coverage. Aim for a consistent thickness, allowing the sauce to meld with the crust as it bakes. The vibrant red of the sauce sets the festive tone for your Mini Halloween Pizzas, and it adds a delicious base flavor.
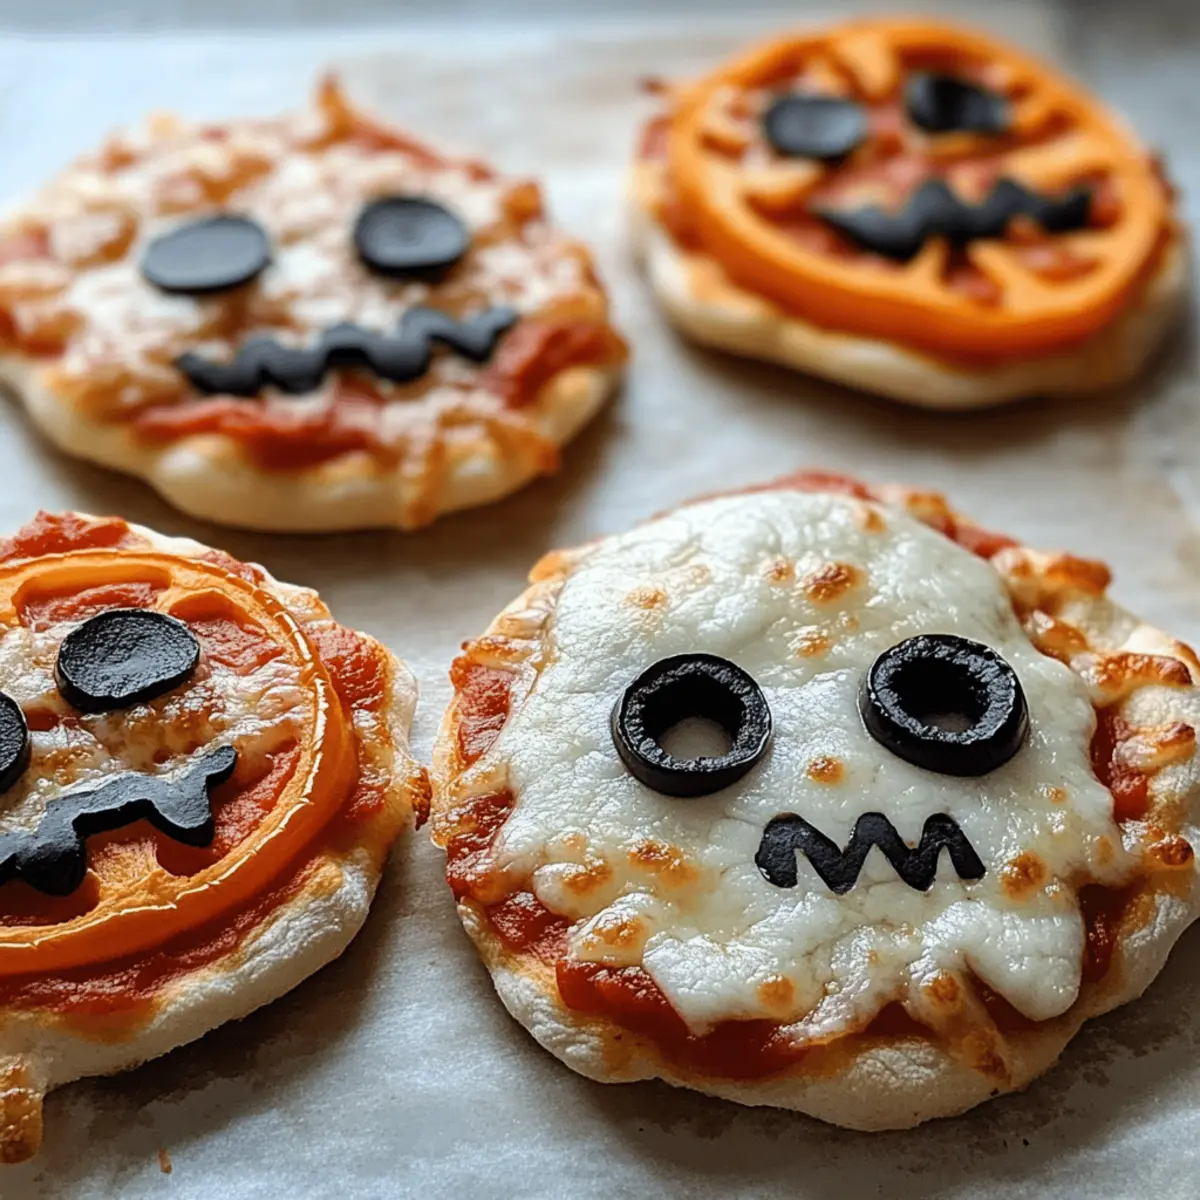
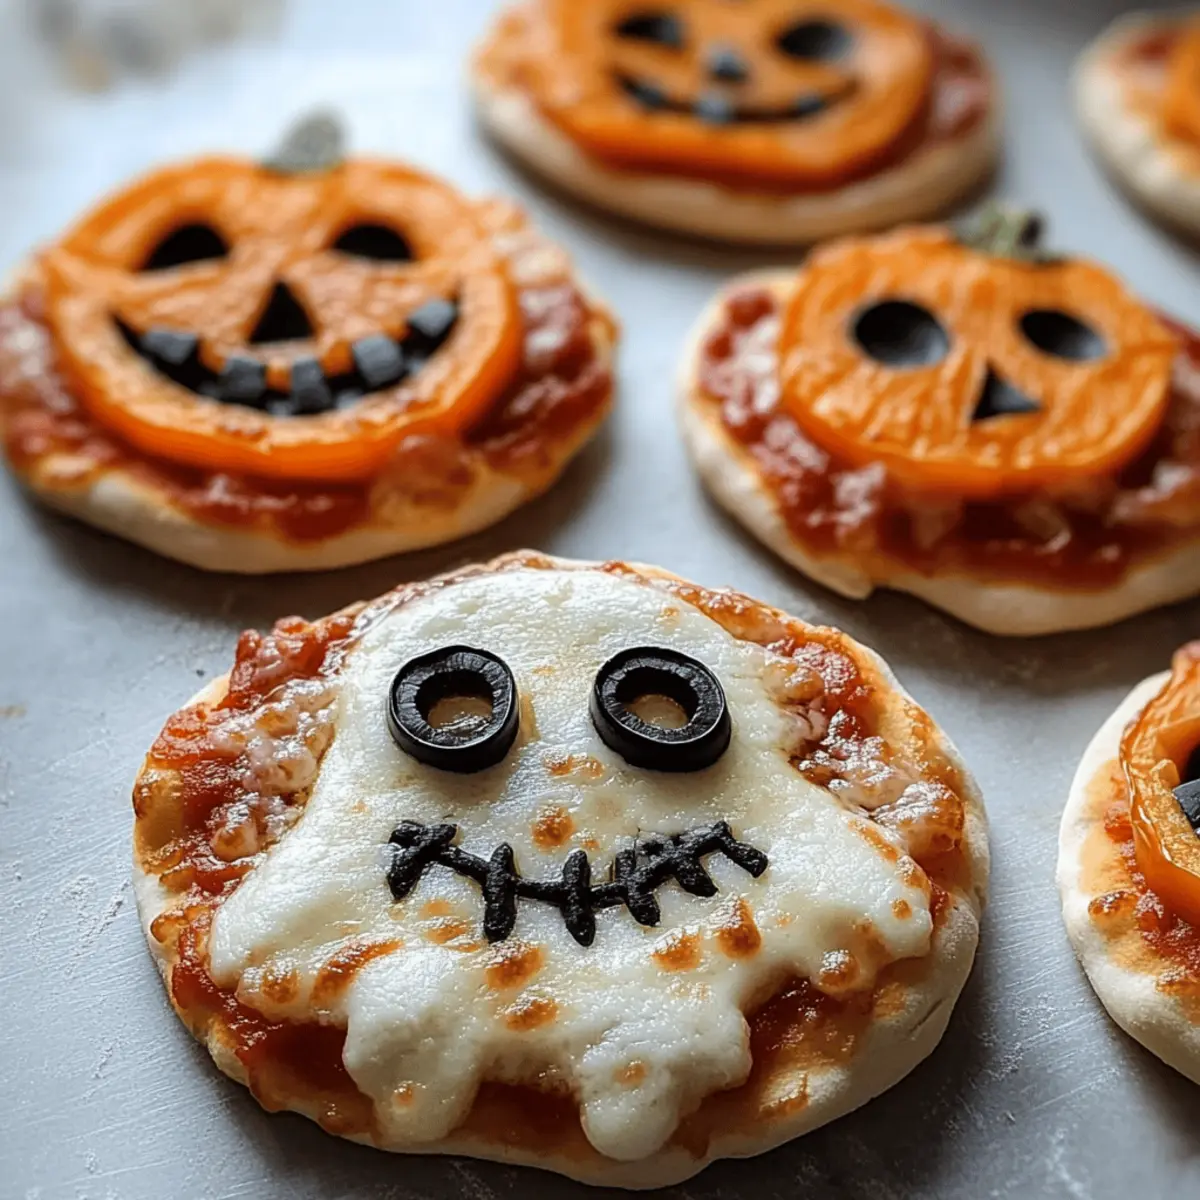
Step 4: Create the Ghost Pizzas
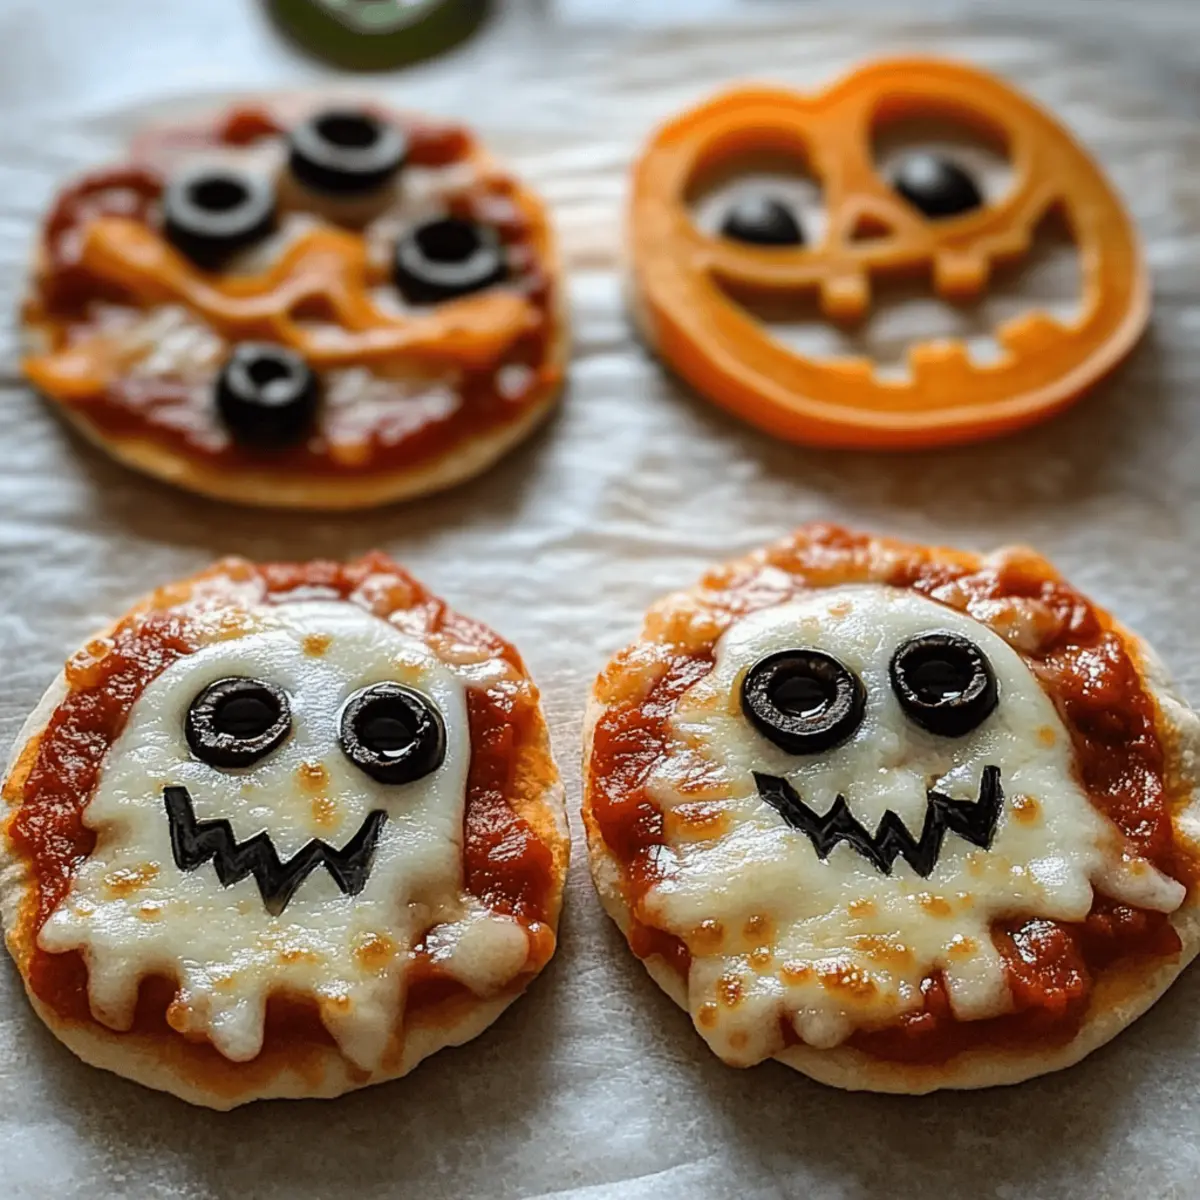
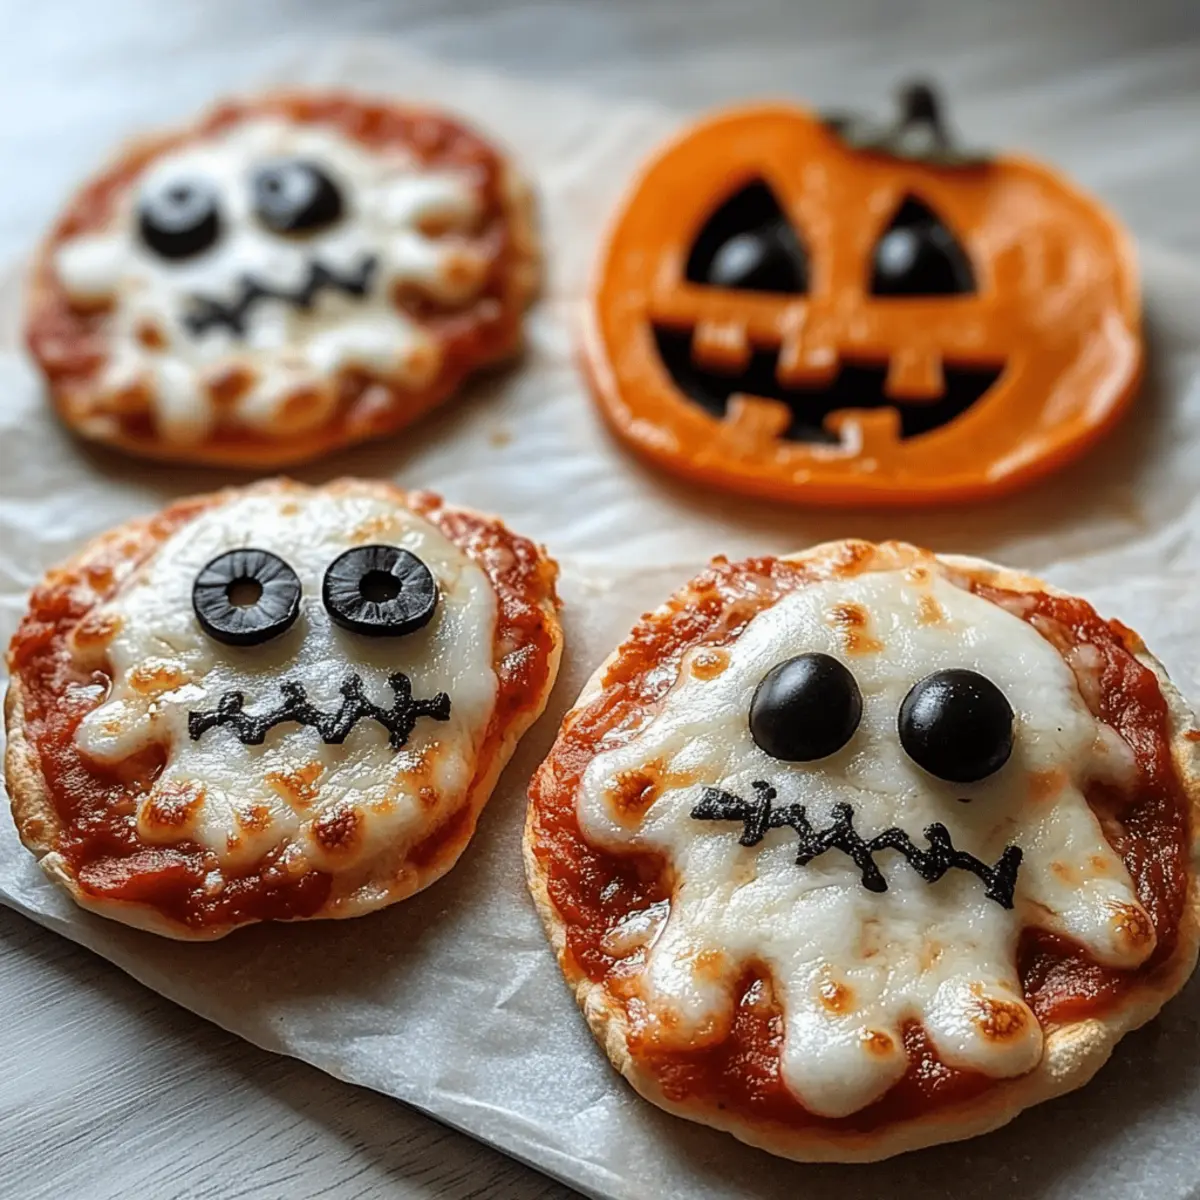
For ghost-themed mini pizzas, take mozzarella slices and cut them into ghost shapes. Gently position these on top of the sauce, leaving some room for their spooky expressions. Add black olive slices as eyes to bring your ghosts to life! These playful designs will give your pizzas a haunting flair that’s perfect for Halloween.
Step 5: Assemble the Mummy Pizzas
Now, let’s get crafty with the mummy pizzas. Layer mozzarella cheese strips in a criss-cross pattern over the sauce. Make sure to leave some gaps for a more authentic look. To finish, place two black olive slices on top as eyes. Your mummies will begin to take shape right before your eyes!
Step 6: Design Jack-o’-Lantern Pizzas
For the jack-o’-lantern themed pizzas, sprinkle shredded cheese generously over the sauce to create a cheesy topping. Use cut-out pieces of orange bell pepper to craft fun and spooky pumpkin faces. Arrange the bell pepper slices thoughtfully, allowing your creativity to shine through as you transform these pizzas into jack-o’-lanterns!
Step 7: Bake to Perfection
Carefully place your baking sheet in the preheated oven and bake the mini Halloween pizzas for 8-10 minutes. Keep a close eye on them; you’ll know they’re ready when the cheese is bubbling and the crust turns a lovely golden brown. This tantalizing aroma will fill your kitchen, making your mouth water in anticipation.
Step 8: Serve Warm
Once baked, remove the mini Halloween pizzas from the oven and let them cool slightly. Serve them warm, allowing your friends and family to indulge in these delightful treats. The combination of fun designs and savory flavors will ensure your Halloween gathering is memorable and filled with joy!
Make Ahead Options
These Mini Halloween Pizzas are perfect for busy home cooks looking to save time while having fun! You can prepare the mini pizza crusts and assemble the toppings up to 24 hours in advance. Simply spread the pizza sauce on the crust, add your toppings, and then wrap them tightly in plastic wrap or store them in an airtight container in the refrigerator. When you’re ready to bake, simply preheat the oven and pop them in for 8-10 minutes, ensuring the crust remains crisp and the cheese melts beautifully. This way, you’ll have festive, delicious pizzas ready to go with minimal effort, letting you enjoy the Halloween festivities with your loved ones!
Storage Tips for Mini Halloween Pizzas
-
Room Temperature: Mini Halloween pizzas are best enjoyed fresh; however, if left out, they can be kept at room temperature for up to 2 hours before they should be refrigerated.
-
Fridge: Store any leftover mini Halloween pizzas in an airtight container in the fridge for up to 3 days. This will retain their flavor and texture, keeping them fresh for your next spooky snack!
-
Freezer: For longer storage, freeze the assembled pizzas before baking. Wrap each pizza tightly in plastic wrap and store in a freezer-safe bag for up to 1 month. Bake directly from frozen, adding a few extra minutes to the cooking time.
-
Reheating: To reheat, place your refrigerated mini Halloween pizzas in a preheated oven at 350°F (175°C) for about 10 minutes, or until warmed through and the cheese is bubbly. Avoid the microwave for best results, as it can make the crust soggy.
What to Serve with Mini Halloween Pizzas?
As you gather your family and friends to enjoy these whimsical, spooky creations, consider adding delightful pairings that will make your Halloween celebration even more memorable.
-
Crispy Veggie Platter: Crisp, fresh veggies like carrots, cucumbers, and bell peppers offer a refreshing contrast to the cheesy pizzas. Dipping sauces like ranch or hummus provide an extra layer of flavor.
-
Spooky Fruit Salad: A colorful medley of seasonal fruits, such as oranges, grapes, and apples, adds a sweet touch that balances the savory pizzas. You can even cut the apples into bat shapes for extra fun!
-
Monster Juice: Get creative with a flavorful drink that matches the festive theme. Blend fruit juices with sparkling water, then freeze gummy candies in ice cubes—perfect for a spooktacular touch!
-
Pumpkin Soup: Serve alongside warm, creamy pumpkin soup for a cozy pairing. Its smooth texture and lightly spiced flavor beautifully complement the savory notes of the mini Halloween pizzas.
-
Haunted Halloween Cupcakes: Offer a sweet treat to finish off the meal. Decorate chocolate cupcakes with orange frosting topped with edible eyeballs or spooky sprinkles to delight both kids and adults.
These pairing ideas create a full menu that’ll make your Halloween gathering deliciously memorable!
Expert Tips for Mini Halloween Pizzas
-
Quality Crusts: Choose light-colored, non-stick baking sheets for evenly cooked mini Halloween pizzas. Avoid dark pans that can burn the undersides of your crust.
-
Watch the Time: Keep a close eye on your pizzas while baking; they typically require just 8-10 minutes. Overbaking can lead to a tough texture, so be vigilant!
-
Topping Fun: Allow kids to help assemble—the more creative, the better! Just ensure that all toppings are kid-friendly and safe for their little hands to manage.
-
Experiment with Flavors: Don’t hesitate to swap traditional toppings for healthier options! Mixing in vegetables or using gluten-free crusts will cater to different dietary needs without sacrificing fun.
-
Storage Tips: Leftover mini Halloween pizzas can be stored in an airtight container in the fridge for up to 3 days. Reheat them in the oven for the best results to keep that delicious crispy crust!
Mini Halloween Pizzas: Customize Your Treats
Get ready to unleash your creativity and make these delightful mini Halloween pizzas uniquely yours!
-
Gluten-Free: Swap mini pizza crusts with gluten-free options, like cauliflower or store-bought gluten-free crusts, for a tasty alternative. Everyone can enjoy a festive bite!
-
Veggie Delight: Replace pepperoni with flavorful veggies such as sliced bell peppers, mushrooms, or even spinach for a fresh, healthier twist. This not only adds nutrition but also vibrant colors.
-
Cheese Lover’s Dream: Mix shredded mozzarella with provolone or gouda for an irresistible cheesy experience. Additionally, consider goat cheese for a tangy touch that elevates your pizza game.
-
Sweet & Savory: Add a drizzle of balsamic glaze over the top of your pizzas after baking. This adds a sweet-sour contrast that complements the savory flavors perfectly.
-
Spicy Kick: Sprinkle some red pepper flakes or jalapeño slices on your pizzas before baking to add a bit of heat. This is a fun way to cater to those who enjoy a fiery kick in their food!
-
Kids’ Creativity: Let the little ones cut different shapes from the cheese and toppings for a whimsical design. Fun shaped foods encourage kids to eat and enjoy their Halloween-themed meals.
-
Simple Dipping Sauces: Serve with ranch, marinara, or garlic butter for that extra dipping fun. These little additions make perfect accompaniments to elevate your spooky treats!
-
Halloween Themes: Consider turning them into “witch’s brew” pizzas by adding unique toppings like pesto or adding a sprinkle of edible glitter for an extra festive look!
With these variations, your mini Halloween pizzas can be as fun and varied as the Halloween festivities themselves. Enjoy mixing flavors and creating memorable treats, and don’t forget to pair them with treats like Halloween Oreo Stuffed cookies for an unforgettable celebration!
Mini Halloween Pizzas Recipe FAQs
What ingredients should I use for the pizza crust?
You can use mini pizza crusts, which are perfect for individual servings. I recommend store-bought options for convenience, but if you’re feeling adventurous, homemade crusts can add a personal touch and be tailored to your liking.
How should I store leftover mini Halloween pizzas?
Place any leftover mini Halloween pizzas in an airtight container and refrigerate them for up to 3 days. This keeps their flavors intact and prevents them from drying out. When you’re ready to enjoy them again, simply reheat in the oven for the best texture.
Can I freeze mini Halloween pizzas?
Absolutely! To freeze the pizzas, assemble each one without baking, wrap them tightly in plastic wrap, and then place them in a freezer-safe bag. They can be stored in the freezer for up to 1 month. When you’re ready to bake, take them straight from the freezer and add an extra 2-3 minutes to the cooking time for perfectly thawed and delicious pizzas.
What are some common mistakes when making these pizzas?
One common issue is overbaking the pizzas, which can lead to a tough crust. Be sure to watch them closely; they only need about 8-10 minutes in the oven. Also, ensure that your toppings are evenly distributed. An abundance of toppings can make the crust soggy, while too few might lead to dry pizzas.
Are there any dietary considerations for servings?
Yes! You can easily cater to dietary needs by opting for gluten-free mini pizza crusts or swapping out regular cheese for dairy-free alternatives. It’s a fun way to ensure everyone can enjoy these festive treats. Always remember to check for allergies, especially for toppings like olives or pepperoni, to make sure all guests are safe!
Mini Halloween Pizzas: Fun and Easy Spooky Treats to Make
Ingredients
Equipment
Method
- Preheat your oven to 400°F (200°C) and line a baking sheet with parchment paper.
- Place your mini pizza crusts on the prepared baking sheet, allowing some space between each one.
- Spread a layer of pizza sauce across each mini pizza crust evenly.
- For ghost-themed pizzas, cut mozzarella slices into ghost shapes and add black olive slices as eyes.
- For mummy pizzas, layer mozzarella cheese strips in a criss-cross pattern and add olive slices for eyes.
- For jack-o'-lantern pizzas, sprinkle shredded cheese and use orange bell pepper to create faces.
- Bake the mini Halloween pizzas for 8-10 minutes until the cheese is bubbling and crust is golden.
- Serve warm and enjoy your fun and creative Halloween treats!
Leave a Reply