
As I pulled the golden-brown Italian sub rolls from the oven, the aroma of sizzling savory meats and melting cheeses wafted through my kitchen, transforming my space into an Italian deli. These Baked Italian Grinder Sandwiches offer a cozy twist on a classic favorite that’s perfect for any occasion, whether you’re a busy weeknight warrior or hosting a gathering with friends. The best part? They come together in just one baking sheet, making cleanup a breeze, and they can be customized with your choice of fillings! Ready to dive into a recipe that guarantees satisfaction? Let’s make some magic with these easy Italian grinder sandwiches that will warm your heart and tummy! What surprises will you add to yours?

Why Are These Sandwiches So Irresistible?
Melty goodness: Each sandwich boasts layers of gooey cheese, ensuring every bite is packed with rich flavor.
Customizable! Mix and match your favorite meats, cheeses, and veggies to create a unique masterpiece tailored to your taste buds.
One-pan convenience: With minimal prep and just one baking sheet, cleanup is a breeze—perfect for busy days or impromptu gatherings.
Crowd-pleaser: Serve these at your next get-together and watch them disappear faster than you can say “Italian grinder!”
Need more delicious ideas? Consider pairing these with a Baked Pumpkin Goat risotto or a Toasted Italian Sandwich for a complete meal that everyone will love!
Baked Italian Grinder Sandwich Ingredients
For the Sandwich
- Italian sub rolls – The perfect sturdy base that holds all the savory fillings; hoagie rolls or ciabatta can be great alternatives.
- Unsalted butter – Adds richness and helps achieve that golden, crispy crust; olive oil works wonderfully as a lighter option.
- Garlic powder – Infuses a warm, savory flavor; use fresh garlic for a more robust taste if you prefer.
- Onion powder – Gives depth to the flavor profile; onion flakes are a good substitute in a pinch.
- Dried oregano – Offers an earthy Italian twist to the dish; fresh oregano can be used to enhance the freshness.
- Dried basil – Adds a sweet, peppery note, perfectly complementing the other flavors; feel free to use fresh if available.
- Red pepper flakes – Provides a delightful zesty kick; adjust to taste or leave out for a milder sandwich.
- Salt – Essential for enhancing the overall flavors; try sea salt or kosher salt for a touch of elegance.
- Black pepper – Introduces a sharpness that rounds out the ingredients; freshly ground is always best for maximum flavor.
For the Fillings
- Deli-sliced salami – Offers a rich, slightly spicy layer; turkey or chicken can make for a lighter option.
- Deli-sliced ham – Adds a hint of sweetness and smoky depth; roast beef is a delicious alternative if you like.
- Deli-sliced pepperoni – Brings a bold, tangy flavor that pairs beautifully; feel free to omit for a more mild sandwich.
- Deli-sliced mozzarella cheese – Melts flawlessly for that gooey texture; provolone is a lovely swap if you prefer.
- Deli-sliced provolone cheese – Adds a slightly sharp note, enhancing the sandwich’s flavor depth; Gouda can also work well here.
- Grated Parmesan cheese – Crisps up beautifully on top, contributing a nutty flavor; nutritional yeast is a great vegan substitute.
For the Toppings
- Roasted red peppers, sliced – Adds sweetness and vibrant color; fresh bell peppers lighten the mix nicely.
- Sliced black olives – Bring a briny flavor that enhances the overall taste; green olives can make a good replacement.
- Banana peppers, sliced – Offers a tangy crunch that elevates the sandwich; jalapeños can be swapped for extra heat.
- Fresh basil leaves – Infuses the dish with vibrant freshness; adjust according to your preference for herbal notes.
These baked Italian grinder sandwiches promise a delightful combination of textures and flavors that will make your mealtime a heartwarming experience! Enjoy crafting your perfect blend of ingredients!
Step‑by‑Step Instructions for Baked Italian Grinder Sandwiches
Step 1: Preheat the Oven
Begin by preheating your oven to 375°F (190°C). This allows it to reach the ideal temperature for baking your sandwich. Meanwhile, gather your ingredients to streamline the process. You’ll want everything ready to create those mouthwatering baked Italian grinder sandwiches in no time!
Step 2: Slice the Rolls
Carefully slice the Italian sub rolls down the middle, ensuring you don’t cut all the way through. This creates a hinge to hold your fillings securely. Position the rolls cut side-up on a baking sheet to prepare for the delicious layering ahead. Visualize each roll opening like a welcoming door to flavor!
Step 3: Make the Herb Butter
In a small saucepan, melt unsalted butter over low heat. Once melted, mix in garlic powder, onion powder, dried oregano, and dried basil until well combined. This fragrant herb butter will add richness and flavor to your baked Italian grinder sandwiches. Brush this golden mixture generously over the cut sides of the rolls for a tasty finish.
Step 4: Layer the Meats and Cheeses
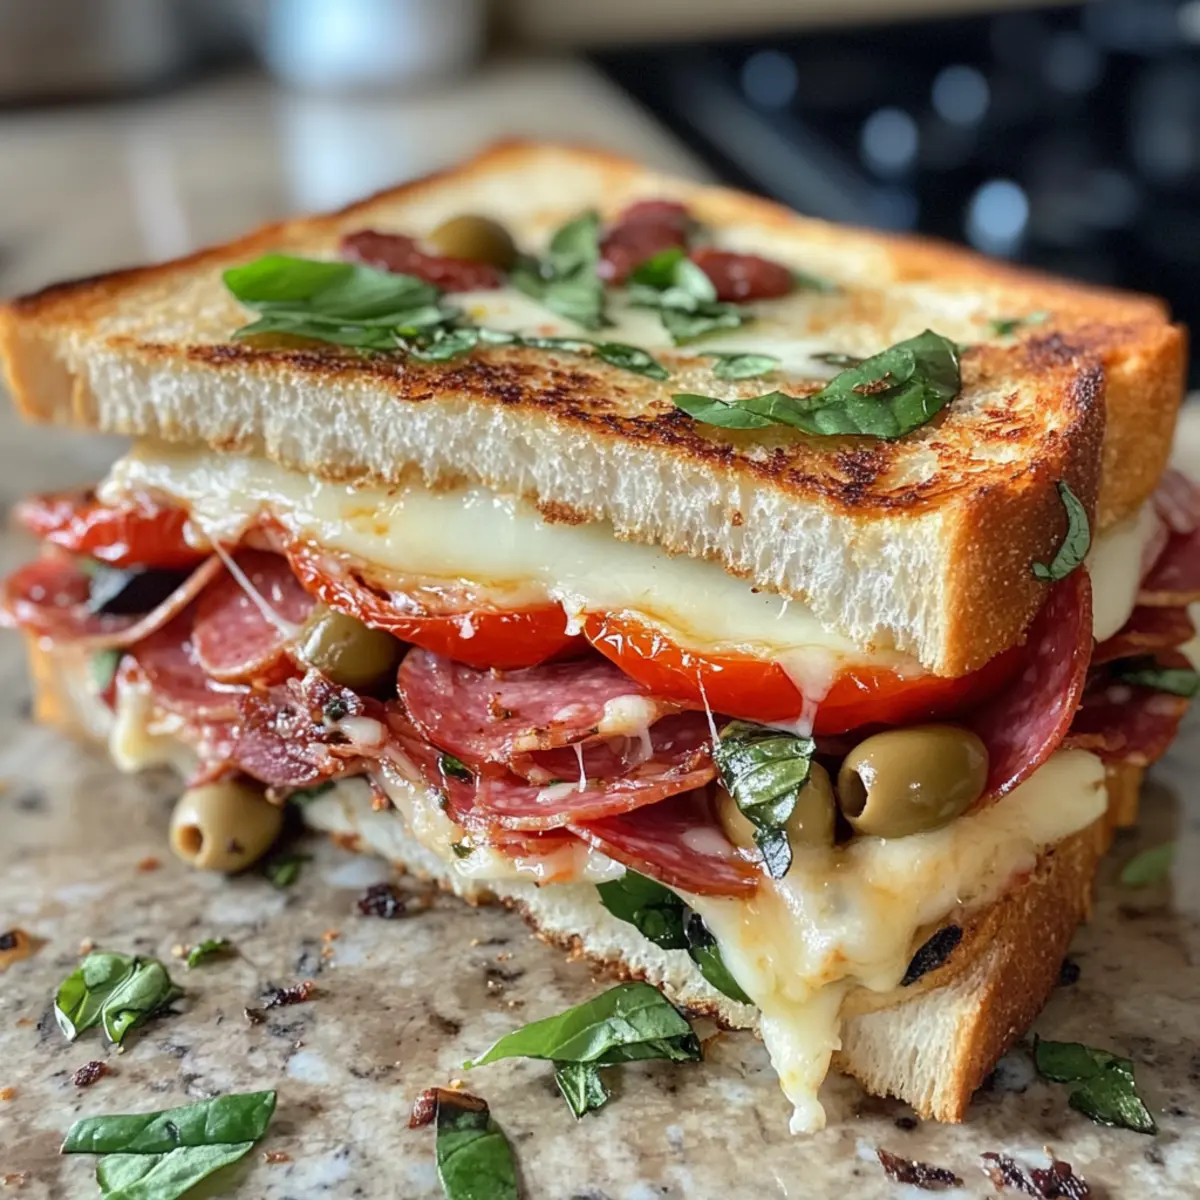
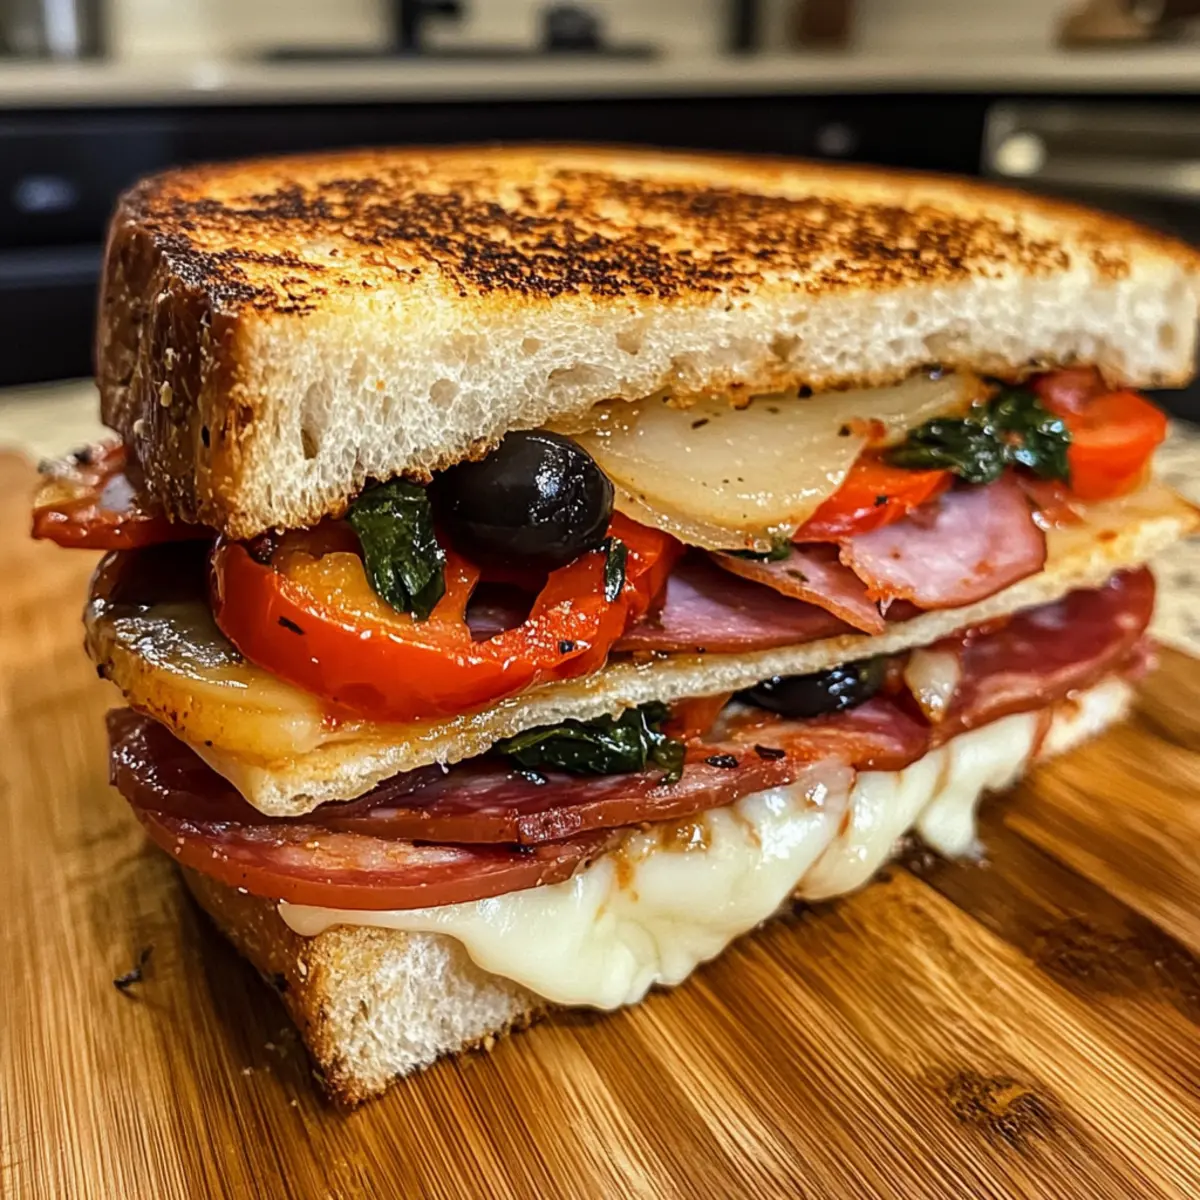
Begin layering the deli-sliced salami on the bottom half of each roll. Follow this with deli-sliced ham and then pepperoni. Finish with a hearty layer of mozzarella and provolone cheeses. The combination of these savory meats and cheeses will create a gooey and satisfying filling as it bakes. Make sure the layers are evenly distributed for a balanced bite!
Step 5: Add Toppings
Next, generously top the layered meats and cheeses with roasted red peppers, sliced black olives, banana peppers, and fresh basil leaves. Each topping brings its own unique flavor and texture, enhancing your baked Italian grinder sandwiches. Don’t be shy; the more vibrant the toppings, the more delicious your sandwiches will be!
Step 6: Bake the Sandwiches
Place the prepared baking sheet in the preheated oven and bake the sandwiches for about 10-12 minutes. Keep an eye on them; you’ll know they’re done when the cheese is melted and bubbly, and the bread is golden brown. The aroma wafting from the oven will have you eagerly anticipating the first bite!
Step 7: Cool and Serve
Once baked, remove the sandwiches from the oven and let them cool slightly for a few minutes. This step is crucial as it prevents the melted cheese from oozing out too much when you cut into them. Finally, use a serrated knife to cut the sandwiches into portions and serve warm, delighting friends and family with your homemade baked Italian grinder sandwiches.

What to Serve with Baked Italian Grinder Sandwiches
Transform your mealtime into a delightful dining experience with these tasty pairings that complement the savory charm of your baked Italian grinder sandwiches.
-
Crispy Potato Wedges: These crunchy, seasoned potato wedges provide a satisfying contrast to the soft, melty sandwich.
-
Garden Salad: A fresh garden salad with vibrant veggies and a tangy dressing adds a refreshing element that balances the richness.
-
Pickles or Giardiniera: The tangy bite of pickles or a zesty giardiniera livens up each mouthful, providing a burst of flavor.
-
Roasted Veggies: Simple roasted vegetables like zucchini and bell peppers amplify the Mediterranean vibes and offer healthy texture.
-
Homemade Coleslaw: Creamy coleslaw or a vinegar-based slaw brings crunch and brightness, making for a well-rounded meal.
-
Italian Pasta Salad: A chilled pasta salad with olives, salami, and cheese plays off the sandwich’s Mediterranean roots and adds heartiness.
-
Classic Italian Soda: Pair with light, refreshing Italian soda for a bubbly touch that enhances the delicious flavors of your meal.
Embrace the warmth of these combinations and create a cozy feast that will leave everyone reaching for seconds!
How to Store and Freeze Baked Italian Grinder Sandwiches
Fridge: Store baked Italian grinder sandwiches in an airtight container in the refrigerator for up to 3 days. Allow to cool completely before sealing to maintain crispiness.
Freezer: For longer storage, freeze unbaked sandwiches wrapped tightly in plastic wrap and aluminum foil for up to 3 months. When ready to bake, simply remove from the freezer and bake directly from frozen, adding a few extra minutes to the baking time.
Reheating: To reheat leftovers, place sandwiches on a baking sheet in a preheated oven at 350°F (175°C) for about 10-15 minutes until heated through and the cheese is melty again.
Make Ahead Options
These Baked Italian Grinder Sandwiches are perfect for meal prep enthusiasts! You can assemble the sandwiches up to 24 hours in advance by following the instructions through the layering step. Wrap the prepared sandwiches tightly in plastic wrap or aluminum foil and refrigerate to maintain freshness. When you’re ready to serve, simply bake them directly from the fridge, adding a few extra minutes to the baking time if necessary to ensure they’re heated through. For longer storage, you can freeze unbaked sandwiches for up to 3 months. Just thaw in the refrigerator overnight before baking, and you’ll have restaurant-quality results with minimal effort!
Expert Tips for Baked Italian Grinder Sandwiches
-
Slicing Technique: Use a serrated knife to slice the rolls, avoiding squishing the delicious fillings inside.
-
Cooling Time: Allow the sandwiches to cool slightly after baking to prevent cheese from oozing when cut.
-
Mix It Up: Don’t hesitate to experiment with different meats, cheeses, and veggies for your baked Italian grinder sandwiches to cater to your taste!
-
Consistent Layering: Ensure even layers of fillings to achieve balanced flavor in every bite. This helps avoid any dry spots!
-
Watch the Bake: Keep an eye on the sandwiches while baking; golden brown bread and bubbling cheese indicate they’re ready for serving.
-
Storage Secrets: Prepare sandwiches in advance and refrigerate for up to 24 hours before baking, or freeze unbaked for up to 3 months for future cravings!
Variations & Substitutions for Baked Italian Grinder Sandwiches
Feel free to explore and make these sandwiches your own with delightful twists and substitutions!
-
Vegetarian Delight: Replace the meats with sautéed mushrooms, bell peppers, and extra cheese for a savory, meat-free option. This variation keeps all the comforting flavors while welcoming in veggie goodness!
-
Spicy Kick: Add sliced jalapeños or increase the red pepper flakes for a delightful heat that pairs beautifully with the rich cheeses and meats. If you like a little fire, this is the way to go!
-
Gluten-Free: Use gluten-free sub rolls or wraps to ensure everyone can join in on the deliciousness. It’s the perfect way to make these sandwiches more inclusive without compromising flavor.
-
Cheesy Extra: Swap in tangy goat cheese or creamy ricotta for a flavor boost and rich texture. These additions will elevate your sandwich, intertwining complex tastes with each glorious bite.
-
Herb Infusion: Experiment with different fresh herbs like thyme or parsley in the herb butter for a unique flavor profile. This offers a surprising twist, keeping your meals lively and fresh.
-
Flavorful Sauces: Spread pesto or sun-dried tomato spread on the inside of the rolls to add layers of flavor. The addition of sauce brings moisture and an extra punch that’s simply irresistible.
-
Sourdough Swap: Use crusty sourdough bread instead of sub rolls for a different texture that pairs well with the melted cheeses. It’s a fantastic twist that brings a little tangy character to your sandwiches.
-
Baked Boursin Option: Try adding a layer of creamy Baked Boursin Salmon for a luxurious touch that combines flavors beautifully with the meats.
With these variations, your homemade baked Italian grinder sandwiches will never feel boring! Each twist allows you to cater to your mood, making every bite a fresh adventure! Enjoy serving these at mealtime or for a special gathering—your family will love each delicious iteration!
Baked Italian Grinder Sandwiches Recipe FAQs
What kind of sub rolls should I use?
I recommend using Italian sub rolls for the best texture and flavor, as they provide a sturdy base that holds the fillings. However, you can also substitute with hoagie rolls or ciabatta bread for a delightful twist!
How should I store leftover Baked Italian Grinder Sandwiches?
Store any leftover baked Italian grinder sandwiches in an airtight container in the refrigerator for up to 3 days. Make sure they cool completely before sealing to keep that nice crispy crust!
Can I freeze Baked Italian Grinder Sandwiches?
Absolutely! To freeze, wrap unbaked sandwiches tightly in plastic wrap and then in aluminum foil. They can be stored in the freezer for up to 3 months. When you’re ready to bake them, you can cook them straight from frozen, adding a few extra minutes to the baking time.
What if my sandwich toppings are too wet?
If you find that your toppings make the sandwiches soggy, try using drier options like well-drained roasted red peppers or patting fresh vegetables down with a paper towel. This will help maintain that delightful crispiness in the baked sandwich.
Are there any common allergens in this recipe?
This recipe contains common allergens like dairy, gluten, and possibly processed meats. If you’re cooking for someone with dietary restrictions or allergies, consider using gluten-free rolls, plant-based cheeses, and alternative proteins like grilled vegetables or tofu. Always check labels for any pre-sliced deli meats and cheeses for specific allergens!
Can I make these sandwiches in advance?
Yes! You can prepare the Baked Italian Grinder Sandwiches in advance by assembling them and then refrigerating them for up to 24 hours before baking. Alternatively, you can freeze them as mentioned earlier, making it easy to enjoy this delicious meal on busy days!
Baked Italian Grinder Sandwiches: A Melty Comfort Food Delight
Ingredients
Equipment
Method
- Preheat your oven to 375°F (190°C) and gather your ingredients.
- Slice the Italian sub rolls down the middle, ensuring you don't cut all the way through.
- Melt unsalted butter in a saucepan and mix in garlic powder, onion powder, oregano, and basil.
- Layer the deli-sliced salami, ham, pepperoni, mozzarella, and provolone on the rolls.
- Top with roasted red peppers, black olives, banana peppers, and fresh basil leaves.
- Bake the sandwiches for about 10-12 minutes until the cheese is melted and bubbly.
- Allow the sandwiches to cool slightly, then cut into portions and serve warm.
Leave a Reply