
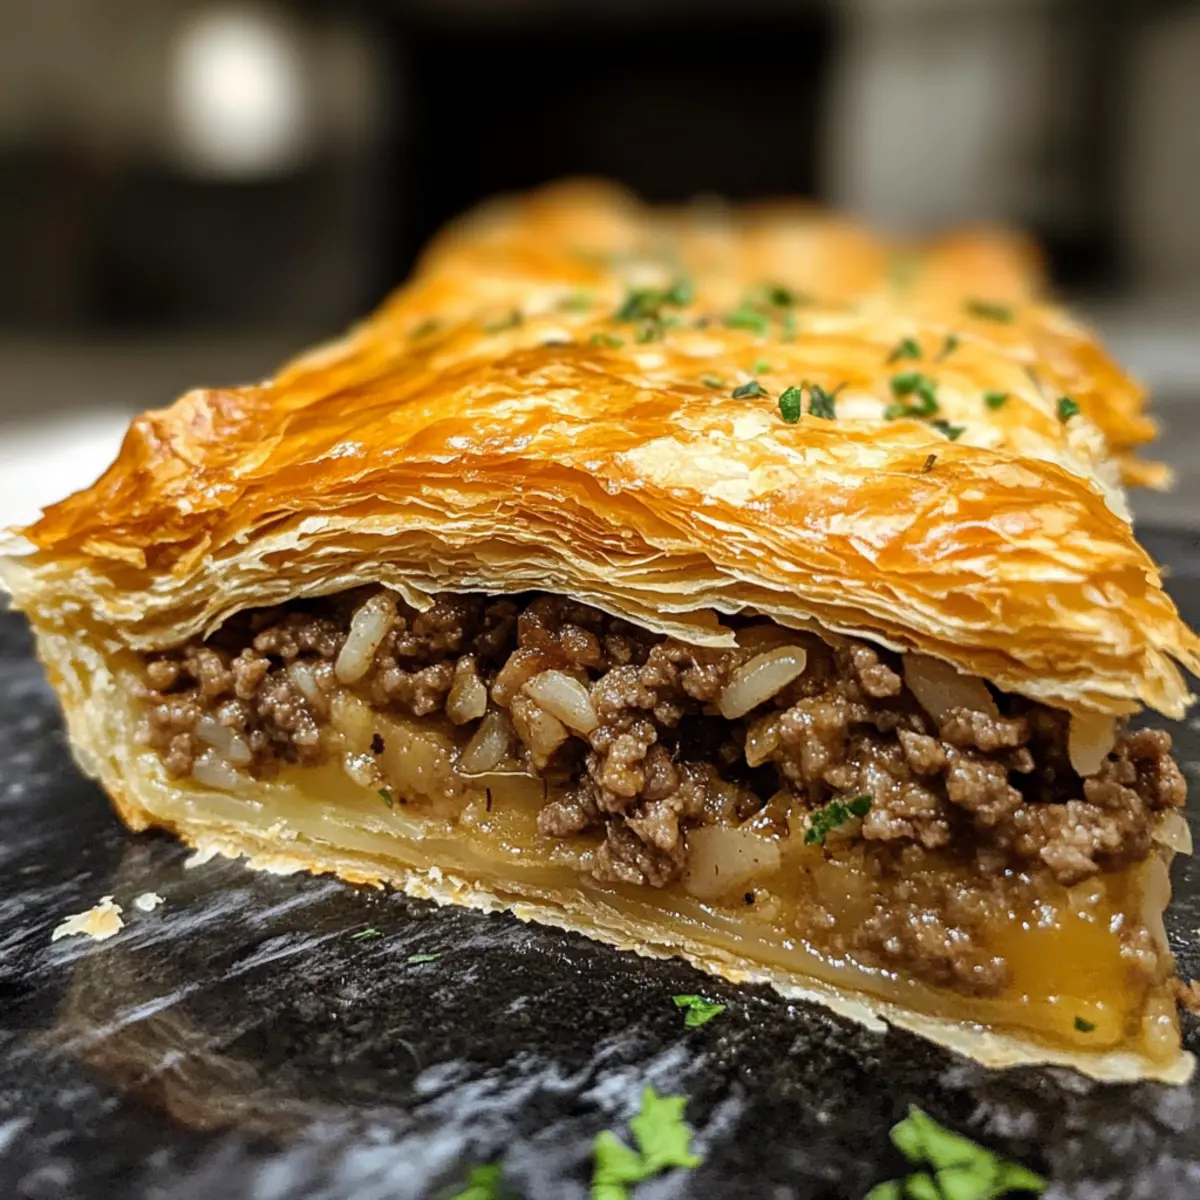
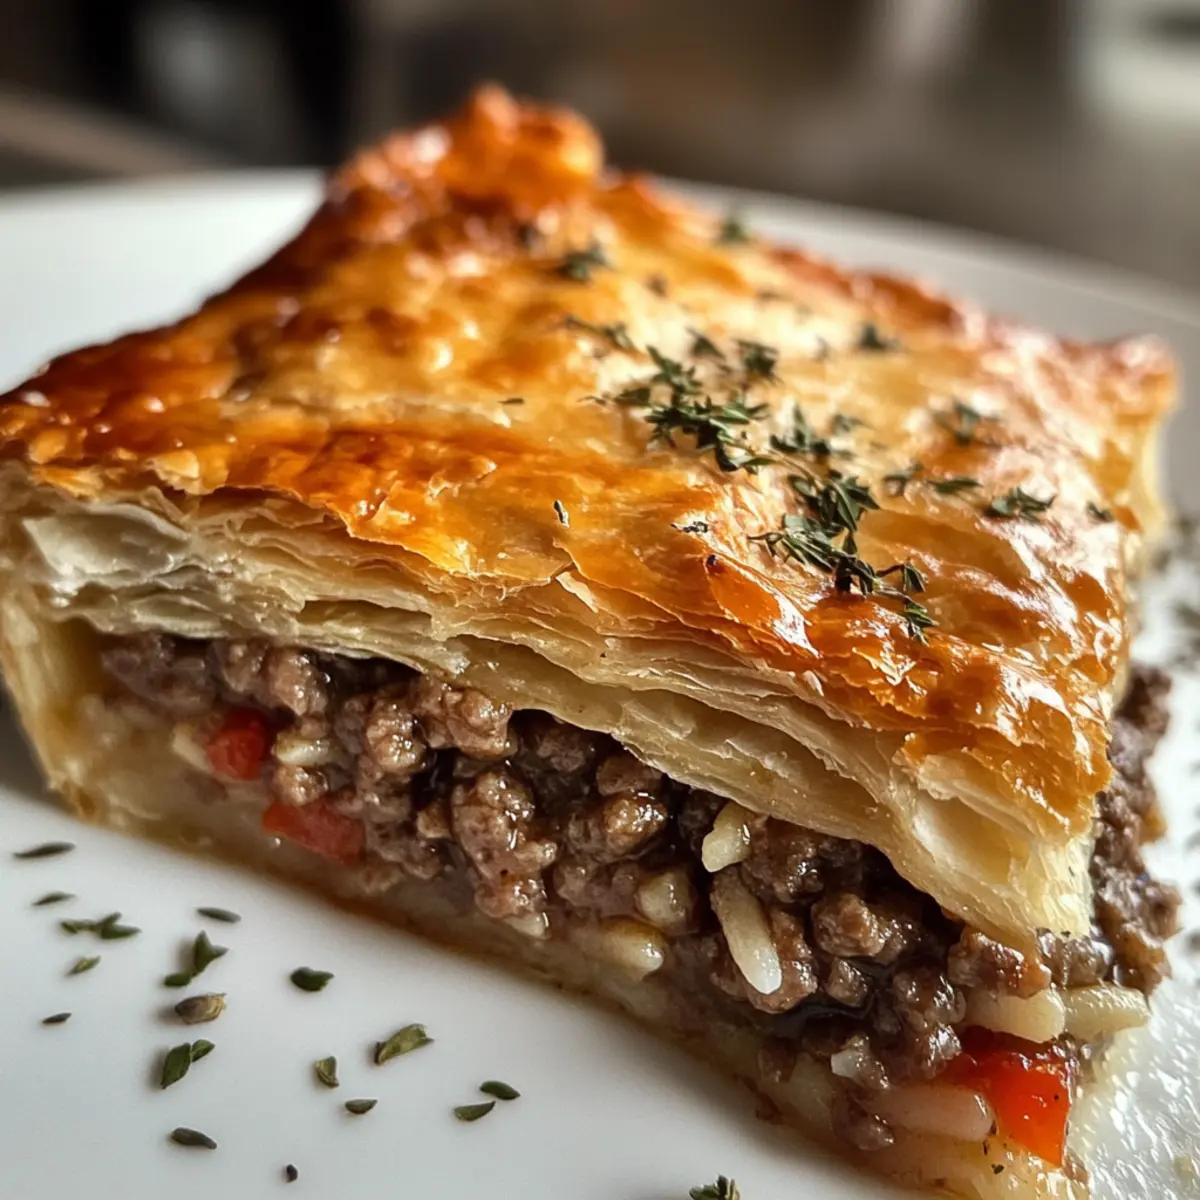
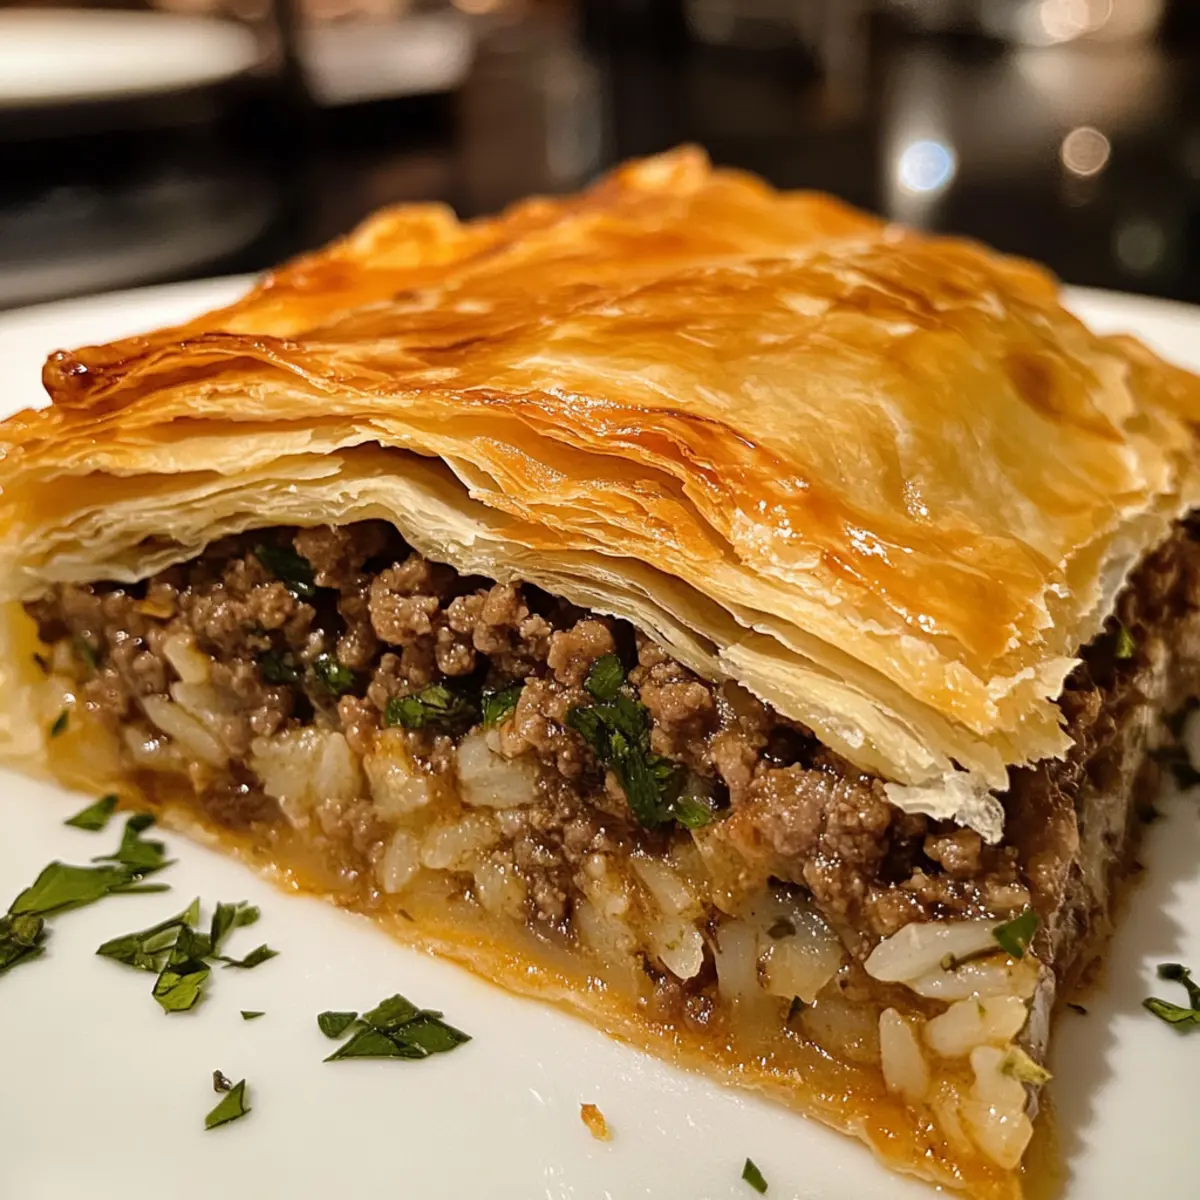
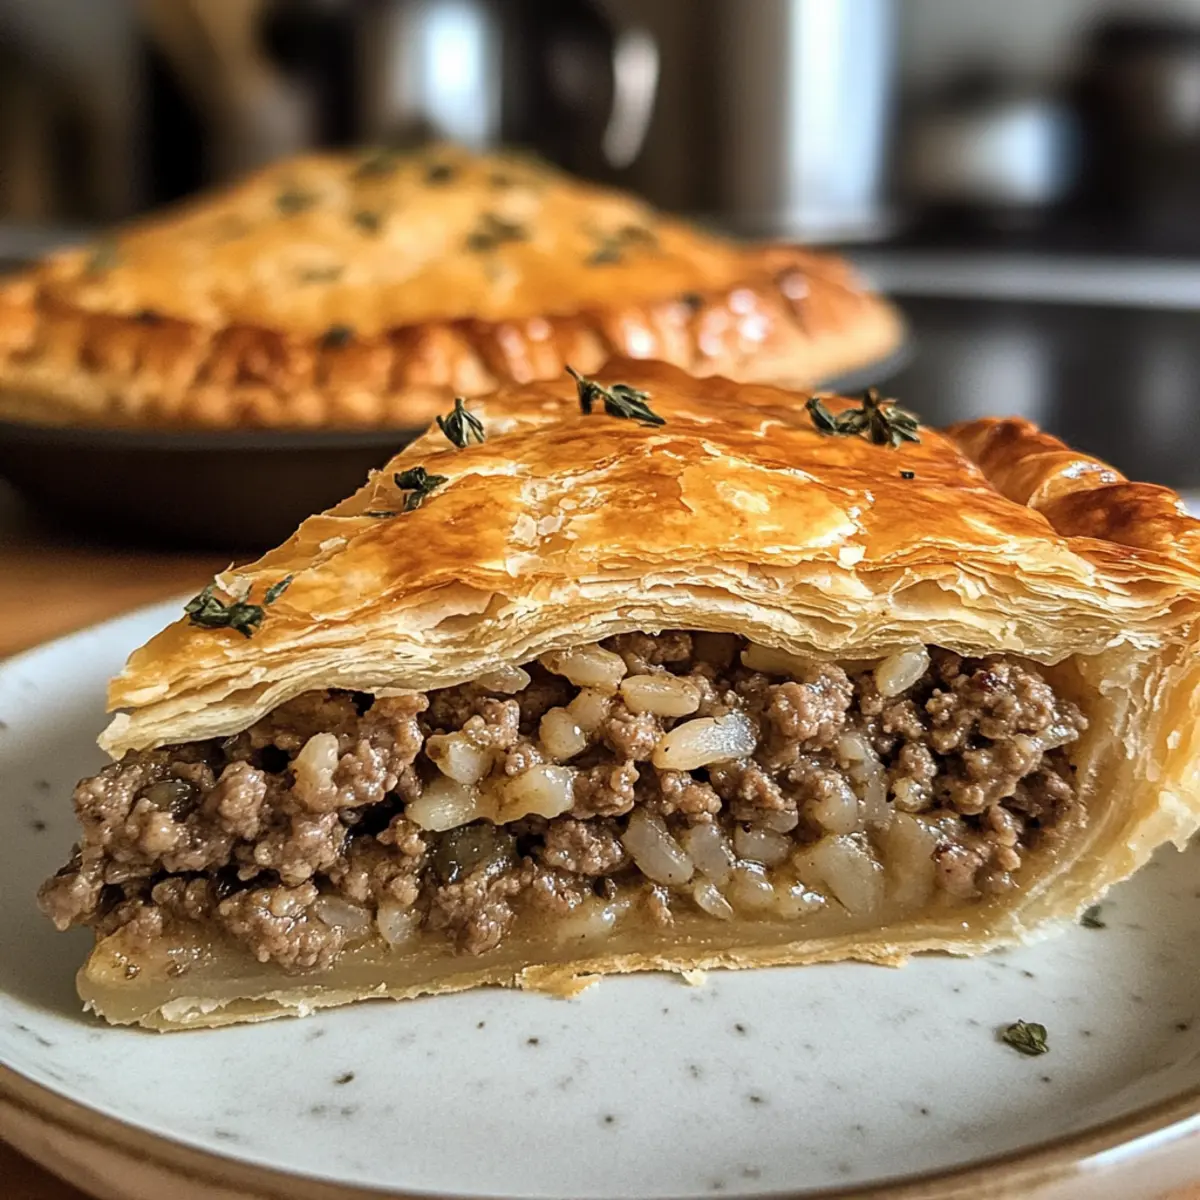
As I rolled out the phyllo dough in my kitchen, I could almost hear the echoes of Greek family gatherings, where laughter filled the air and the tantalizing scent of baking Kreatopita made everyone gather around the table. This delightful Greek meat pie is not only a feast for the senses but also a comforting dish that brings people together. The Kreatopita recipe I’m sharing today combines flaky pastry with a savory filling of seasoned ground beef and rice, making it the perfect solution for both busy weeknights and festive celebrations. It’s incredibly easy to prepare and is a fantastic option for leftovers or even freezing. Are you ready to create a dish that will warm your heart and tantalize your taste buds? Let’s dive into the world of Kreatopita!
Why is Kreatopita a Must-Try?
Irresistible Flakiness: The layers of phyllo dough create a golden, crispy exterior that crumbles beautifully with each bite.
Savory Goodness: This pie is packed with savory ground beef and rice, simmered in tomato sauce and fragrant herbs, making it a flavor powerhouse.
Perfect for Sharing: Whether it’s a cozy family dinner or a festive gathering, this dish has crowd-pleaser written all over it.
Easy to Customize: Don’t hesitate to experiment with different meats or grains. Substitute ground lamb or try quinoa for a unique twist!
Leftover Friendly: Make it ahead and freeze for quick meals. Enjoy leftover slices reheated to perfection and still bursting with flavor—it’s as delightful as a casual dish or a special treat!
For more hearty inspiration, you might also enjoy my Beans Potatoes Bacon or Chinese Sweet Sour.
Kreatopita Recipe Ingredients
For the Filling
- Ground Beef – This main filling component provides rich flavor and protein; can substitute with ground lamb or pork for different tastes.
- Onion – Adds sweetness and depth to the filling; sauté until soft for maximum flavor.
- Rice – Acts as a filler that absorbs flavors and adds texture; long-grain white rice is ideal; par-cook brown rice for even cooking.
- Tomato Sauce – Moistens the filling and adds acidity for balance.
- Oregano – Provides an herby aroma and flavor; can substitute with thyme or marjoram.
- Salt & Pepper – Essential for seasoning; adjust to taste.
For the Crust
- Phyllo Dough – Forms the flaky crust; brush with butter or oil between layers for texture.
- Butter/Oil – Adds richness to the crust and helps achieve a golden color during baking.
For Garnish
- Fresh Parsley or Dill – Offers a fresh flavor and vibrant color for topping.
- Lemon Wedges – Optional for serving; adds a bright, zesty contrast to the meaty pie.
Now that you have everything you need, let’s prepare to create the delicious Kreatopita recipe that will surely impress and warm up any gathering!
Step‑by‑Step Instructions for Kreatopita Recipe
Step 1: Prepare the Filling
Start by heating a large skillet over medium heat and adding a splash of oil. Sauté the finely chopped onion for about 5-7 minutes or until it becomes translucent and fragrant. Next, add the ground beef to the skillet, cooking for 8-10 minutes until browned. Incorporate the rice, tomato sauce, oregano, salt, pepper, and a splash of water; simmer this mixture for 10 minutes until everything is well combined and flavorful.
Step 2: Assemble the Pie
Preheat your oven to 180°C (350°F). While the oven heats up, grab a baking dish and brush it generously with melted butter or oil to prevent sticking. Layer five sheets of phyllo dough in the dish, brushing each sheet with butter to add richness and crispiness. Once layered, evenly distribute the meat and rice filling over the phyllo, smoothing it out gently for even coverage.
Step 3: Top with Phyllo
Now it’s time to create the top crispy layer of your Kreatopita. Place the remaining five sheets of phyllo on top of the filling, again brushing each sheet with melted butter for that perfect golden crust. Make sure to tuck the edges of the phyllo down neatly into the sides of the dish to secure the filling and maintain an appealing shape during baking.
Step 4: Bake and Serve
Put your assembled Kreatopita in the preheated oven and bake for 40-45 minutes, or until the top is beautifully golden and crisp. You’ll know it’s ready when the kitchen fills with a delightful aroma, signaling that it’s time to take it out. Allow the pie to cool slightly before slicing to enhance the flavors, then serve warm, garnished with fresh parsley or dill and lemon wedges if desired.
What to Serve with Kreatopita Recipe
Looking to complement the warm, flaky goodness of your Kreatopita? Here are some delightful pairings that elevate your meal experience.
-
Greek Salad: A refreshing mix of cucumbers, tomatoes, olives, and feta cheese drizzled with olive oil. It adds a vibrant contrast to the savory pie.
-
Roasted Vegetables: Seasoned and caramelized seasonal veggies offer a sweet and earthy balance that harmonizes beautifully with the meat pie.
-
Tzatziki Sauce: This cool yogurt and cucumber dip adds a creamy texture and refreshing tang that enhances the flavors of the Kreatopita.
-
Lemon Wedges: A simple yet zesty addition that brightens each bite, cutting through the richness of the meat and pastry.
-
Herbed Couscous: Fluffy and light, this grain dish can soak up the delicious juices from the pie, making for a wholesome and filling meal.
-
Mint Tea: A warm, soothing beverage that serves as a delightful palate cleanser, perfect for finishing off a comforting meal with a sweet touch.
Pair these options with your Kreatopita for a well-rounded feast that will impress your family and friends!
How to Store and Freeze Kreatopita
Fridge: Keep leftovers in an airtight container for up to 3 days. Reheat slices in the oven to maintain the crust’s crispness and flavor.
Freezer: To freeze, slice the Kreatopita and wrap each piece tightly in plastic wrap, then place in a freezer-safe bag for up to 3 months.
Reheating: Thaw frozen slices overnight in the fridge. Reheat in the oven at 180°C (350°F) for about 20 minutes until heated through and crispy. Enjoy your delectable Kreatopita as if it were freshly made!
Kreatopita Recipe Variations
Feel free to explore these creative twists that will make your Kreatopita uniquely yours and bring a fresh flavor to your table!
-
Lamb Swap: Use ground lamb instead of beef for a richer, slightly gamey flavor that complements the spices beautifully.
Lamb brings a whole new layer of taste, making every bite a delightful adventure. -
Grain Alternatives: Substitute white rice with cooked quinoa or farro for a nutty texture and extra nutrients.
These grains will create a satisfying filling while altering the taste profile just enough to challenge your palate. -
Vegan Option: Replace the meat with a mixture of sautéed mushrooms, lentils, and walnuts for a heartwarming vegan alternative.
This twist still delivers that comforting feeling and satisfies even the most devoted meat lovers! -
Cheesy Delight: Add crumbled feta or cheddar cheese to the filling for an irresistible cheesy flavor throughout the pie.
The melty goodness pairs wonderfully with the savory meat and tender rice—comfort food at its finest. -
Herb Explosion: Experiment with fresh dill, mint, or parsley mixed into the filling to amp up the flavor profile.
These herbs will introduce a refreshing brightness that takes your Kreatopita to the next level. -
Spicy Kick: Mix in some red pepper flakes or a dash of cayenne pepper to the filling for a subtle heat.
This variation adds excitement, especially for those who crave a bit of spice in their comfort food. -
Mini Versions: Create individual-sized Kreatopitas by using muffin tins instead of a baking dish for a fun serving idea.
Perfect for parties, these little pies are delightful finger foods that everyone will adore! -
Sweet Twist: Combine finely chopped apples or raisins with the filling for a sweet and savory experience.
This unexpected blend adds complexity and turns the traditional dish into a unique delight, reminiscent of sweet pastries.
Ready to get creative? With these variations, your Kreatopita will always surprise, delight, and satisfy every craving! If you’re interested in more hearty options, you might also enjoy my mouthwatering Beans Potatoes Bacon or the flavorful Chinese Sweet Sour.
Make Ahead Options
These Kreatopita are perfect for meal prep enthusiasts looking to save time during busy weeknights! You can prepare the filling (sautéing the onions, browning the ground beef, and simmering with rice and sauce) up to 24 hours in advance. Simply cool the mixture, refrigerate it covered, and assemble it into the phyllo dough the next day. If you’re short on time, you can also layer the assembled pie and keep it covered in the refrigerator for up to 3 days. When ready to bake, just preheat your oven and pop it in for about 40-45 minutes for a golden result that tastes just as delicious as when freshly made.
Tips for the Best Kreatopita Recipe
-
Keep Phyllo Moist: Cover unused phyllo sheets with a damp towel to prevent them from drying out while you work. This keeps them pliable and makes layering easier.
-
Layer Wisely: Don’t skimp on the butter or oil between phyllo layers! Brush each layer generously to ensure a golden, flaky crust that crisps beautifully.
-
Watch the Bake Time: Every oven is different; keep an eye on your Kreatopita as it bakes. If the top browns too quickly, tent it with foil to prevent burning.
-
Let It Rest: Allow the pie to cool for about 10 minutes before cutting into it. This helps the filling set and makes for cleaner slices.
-
Freezing Made Easy: If you have leftovers or want to make a batch ahead of time, freeze slices individually, thawing them overnight and reheating in the oven for best results.
-
Experiment with Fillings: Feel free to customize your Kreatopita by using herbs or swapping out meats. A blend of ground lamb and beef, for example, adds a rich flavor profile to your recipe!
Kreatopita Recipe FAQs
What type of ground meat is best for Kreatopita?
Absolutely! While ground beef is traditional for Kreatopita, you can also use ground lamb or pork for a different flavor profile. If you’re looking to make it a bit healthier, consider leaner options or even a mix of meats.
How long can I store leftover Kreatopita in the fridge?
I recommend keeping your leftover Kreatopita in an airtight container in the fridge for up to 3 days. Make sure to reheat it in the oven to preserve that lovely crispy crust!
Can I freeze Kreatopita, and how do I do it properly?
Very! To freeze your Kreatopita, first let it cool completely. Then, slice it into individual portions. Wrap each slice tightly in plastic wrap and place them in a freezer-safe bag or container. It can be frozen for up to 3 months. When you’re ready, simply thaw overnight in the fridge and reheat in the oven at 180°C (350°F) for about 20 minutes.
What if the phyllo dough tears while I’m assembling the pie?
No worries! If your phyllo dough tears, just patch it up with another layer. The beauty of phyllo is in the layers, so you can always add more on top. Don’t let minor tears discourage you; your Kreatopita will still turn out delicious!
Are there any dietary considerations for this recipe?
Absolutely! If you’re cooking for someone with gluten sensitivities, you can substitute regular phyllo dough with gluten-free phyllo. When it comes to allergens, keep an eye on cross-contamination, especially with the butter or oil you choose. This recipe is quite versatile, so feel free to adjust ingredients according to dietary needs.
Can I prepare Kreatopita ahead of time?
Yes, you can! Prepare the filling a day in advance and keep it in the fridge. You can assemble the pie up to a day before baking. Just cover it tightly in the fridge to keep the phyllo from drying out. It’s a fantastic option for entertaining, as it allows you to spend less time in the kitchen and more time with your guests.
Delicious Kreatopita Recipe: Flaky Greek Comfort Food Delight
Ingredients
Equipment
Method
- Heat a large skillet over medium heat and add a splash of oil. Sauté the finely chopped onion for about 5-7 minutes until translucent.
- Add the ground beef to the skillet and cook for 8-10 minutes until browned.
- Incorporate rice, tomato sauce, oregano, salt, pepper, and a splash of water; simmer for 10 minutes until well combined.
- Preheat the oven to 180°C (350°F). Brush a baking dish with melted butter or oil.
- Layer five sheets of phyllo dough in the dish, brushing each sheet with butter.
- Distribute the meat and rice filling evenly over the phyllo layer.
- Place the remaining five sheets of phyllo on top, brushing each with butter.
- Tuck the edges of phyllo down neatly into the dish sides.
- Bake for 40-45 minutes, or until the top is golden and crisp. Cool for 10 minutes before slicing.
Leave a Reply